Configure the StudyStash enterprise application for SAML single sign-on.
Before you begin
In StudyStash, open Integrations → Single Sign-On (SSO) and choose Microsoft Entra. Copy the Entity ID and Reply URL from SAML settings. See the SSO setup guide if you need help.
Make sure you have permission to create and configure enterprise applications in Microsoft Entra ID.
1
Create the enterprise application
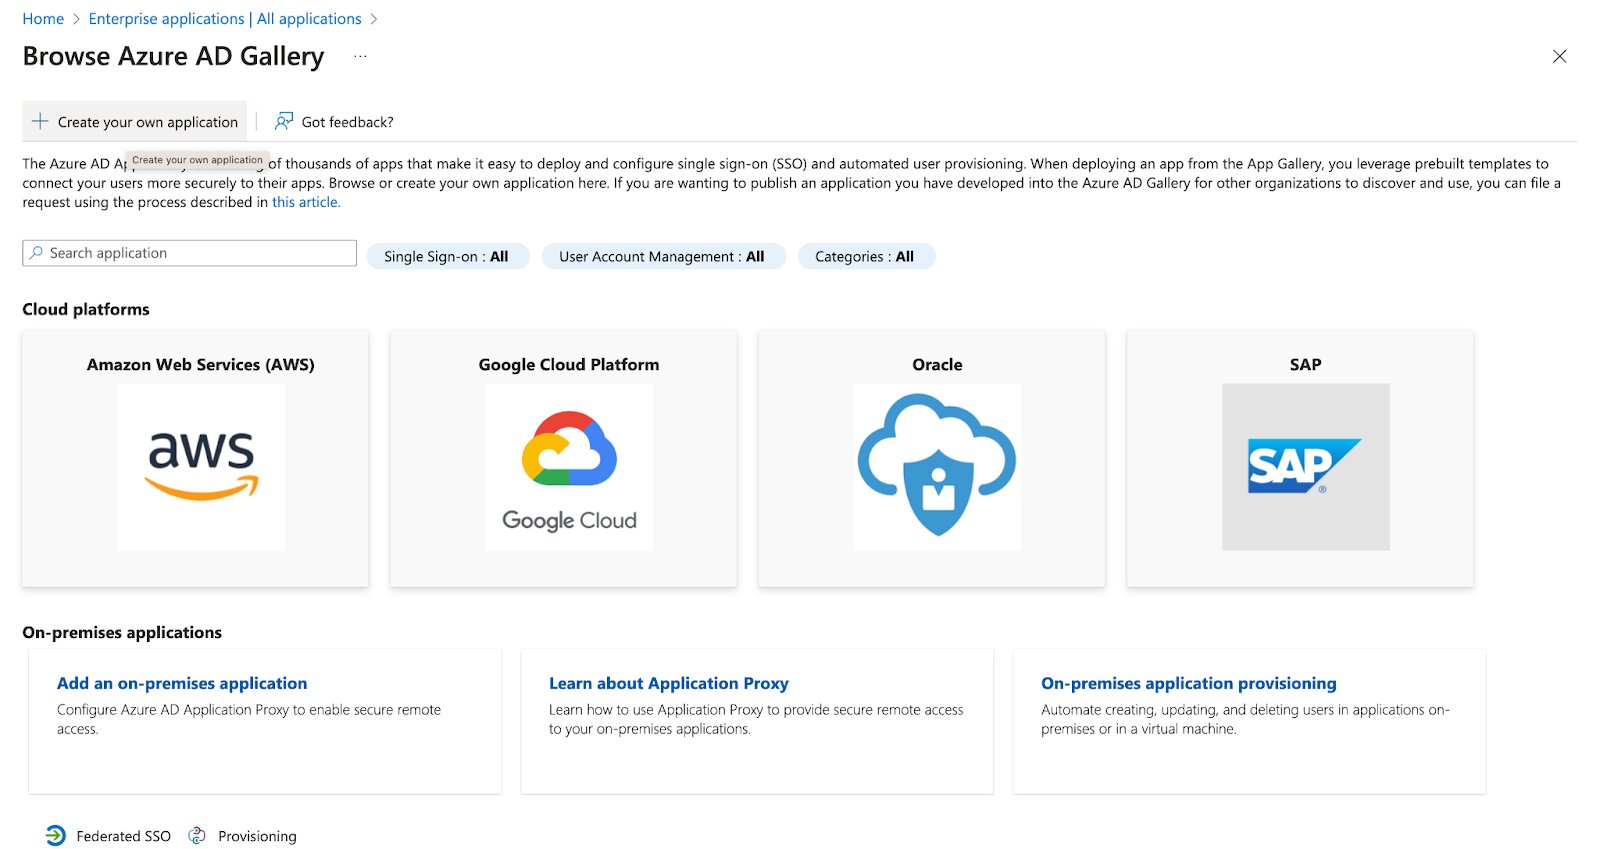
In the Microsoft Entra admin centre, open Enterprise applications. Select New application, then Create your own application.
Create an enterprise application
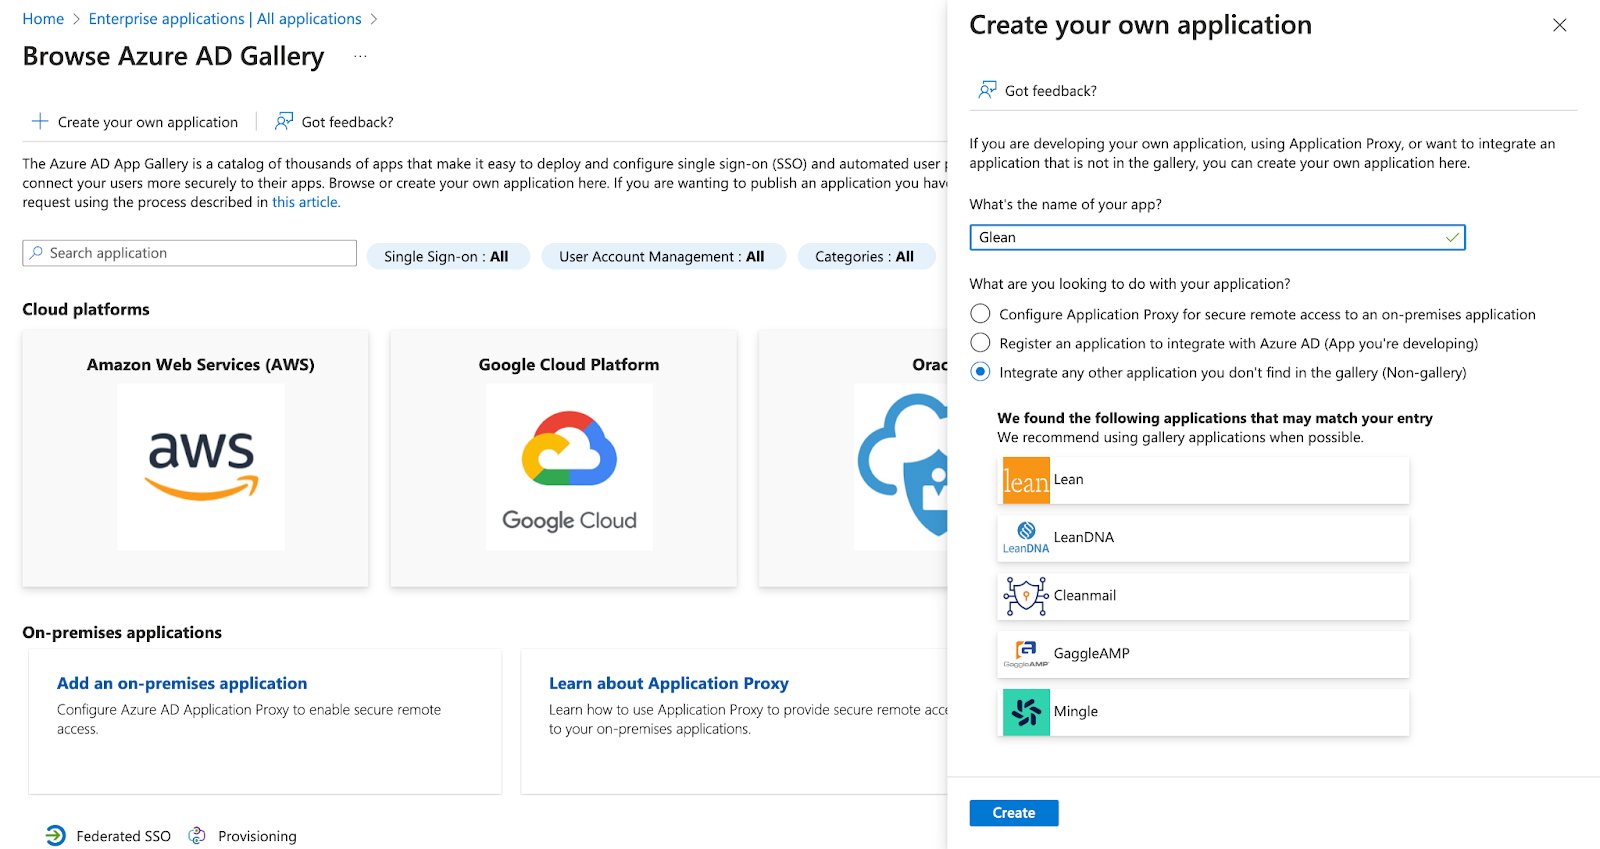
Name the application StudyStash, choose Integrate any other application you don’t find in the gallery (Non-gallery), then select Create.
Create the StudyStash application
2
Assign users or groups
Assign the users or groups who should be able to sign in. Follow Microsoft’s user and group assignment guide. For a pilot, check the access scope with your StudyStash contact.
3
Enter the SAML configuration
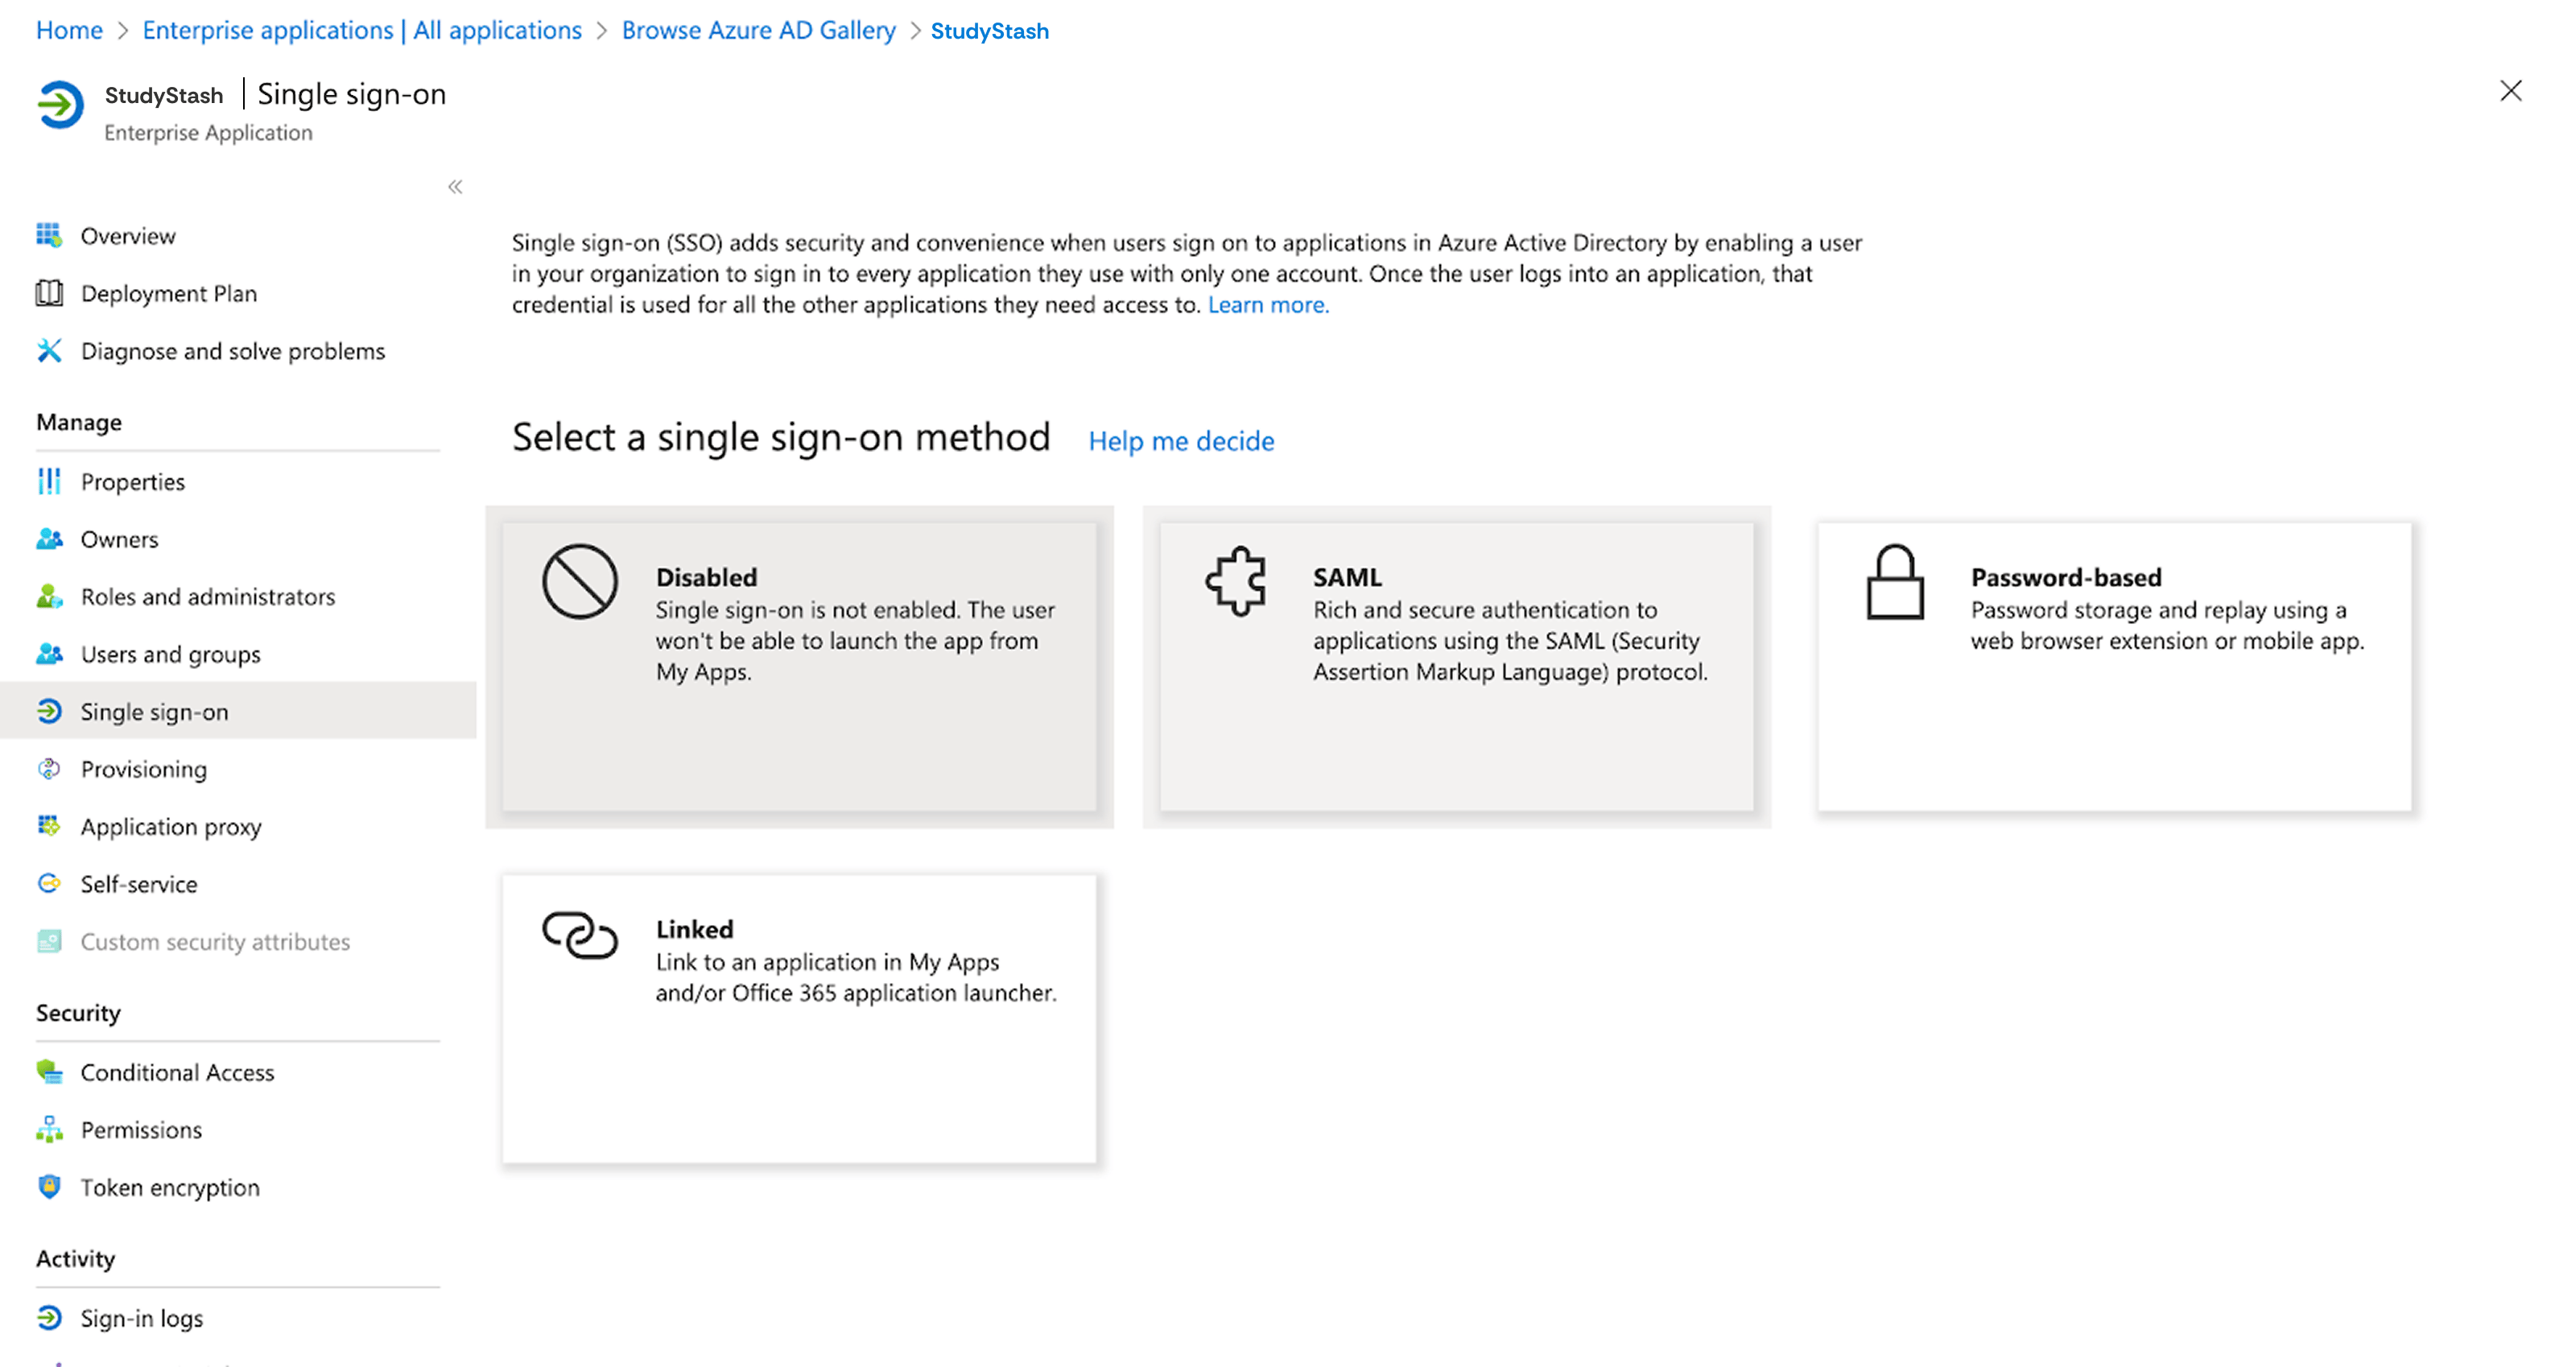
Open Single sign-on and choose SAML. Edit Basic SAML Configuration, enter the Identifier (Entity ID) and Reply URL copied from your StudyStash SSO page, then select Save.
Choose SAML
4
Check attributes and claims
Edit Attributes & Claims and check the email NameID format and claims below.Confirm the required email value is populated for the users you assign.
5
Import the metadata into StudyStash
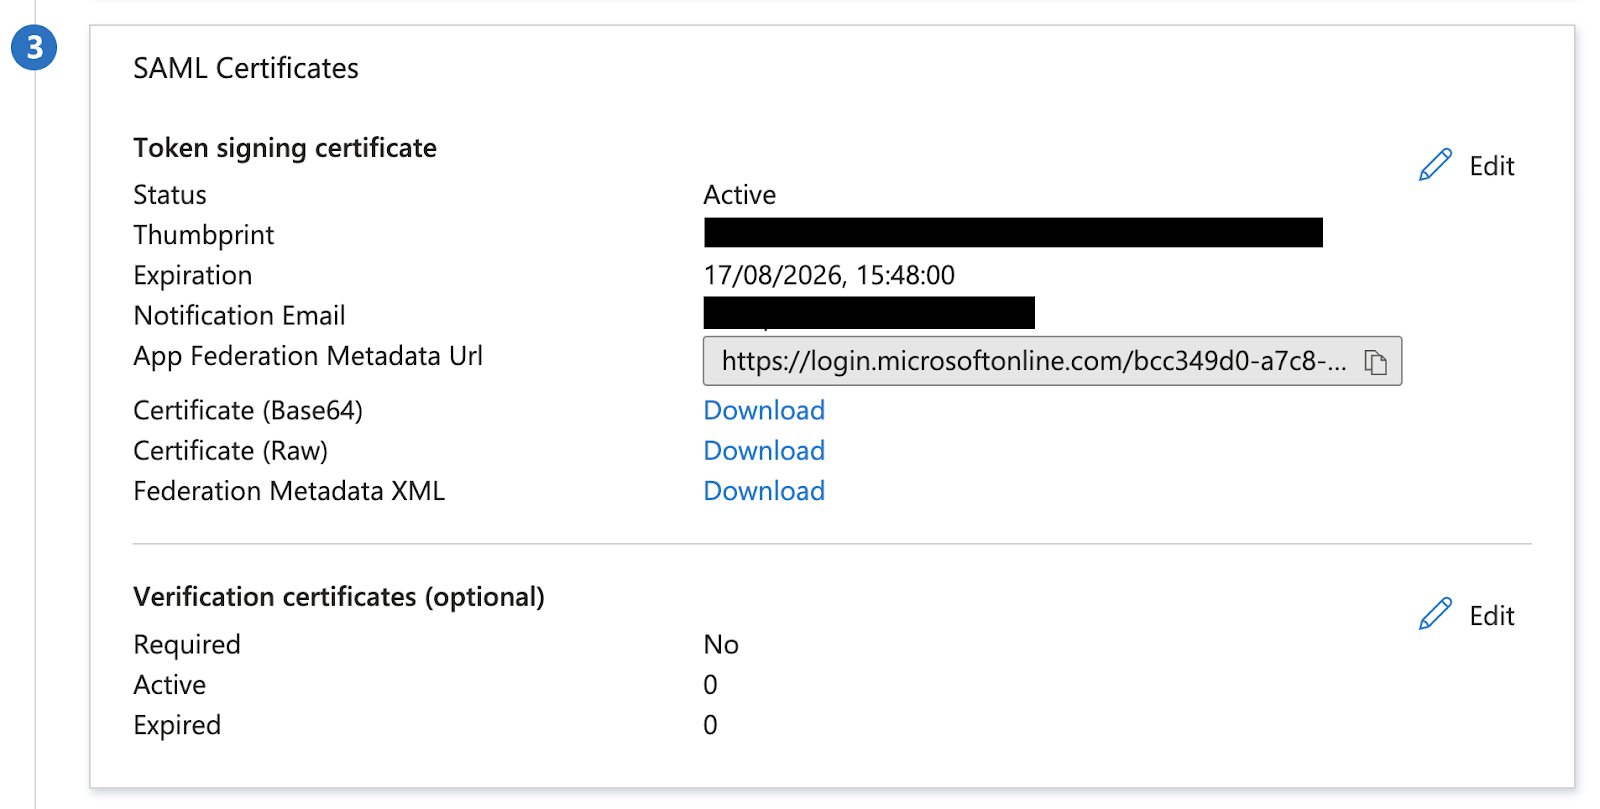
Under SAML Certificates, copy the App Federation Metadata Url.
Copy the metadata URL
Return to StudyStash. Paste the URL into App Federation Metadata URL and select Import metadata. Review the result, then select Send for setup or Save changes for an existing connection.While Awaiting StudyStash is shown, we are finishing setup.Once ready, select Test connection. StudyStash will watch for a successful sign-in to confirm SSO is working. Sign in as an assigned user in the new tab; the status changes to Connected after StudyStash confirms access.Test attempts expire within 10 minutes. If yours expires, select Test connection to start again.See testing and troubleshooting for sharing a test link, retrying or getting help.
{"docsConfig":{"theme":"mint","$schema":"https://mintlify.com/docs.json","name":"StudyStash Help Centre","description":"Guides and support for StudyStash students, instructors and administrators.","colors":{"primary":"#004C89","light":"#93BCE8","dark":"#004C89"},"logo":{"light":"https://mintcdn.com/studystash-help/UbXlxW0z5agaJ_Cy/logo/studystash-logo-colour-rgb.png?fit=max\u0026auto=format\u0026n=UbXlxW0z5agaJ_Cy\u0026q=85\u0026s=b42380e4f9b27366a5d79712531f7301","dark":"https://mintcdn.com/studystash-help/UbXlxW0z5agaJ_Cy/logo/studystash-logo-white-rgb.png?fit=max\u0026auto=format\u0026n=UbXlxW0z5agaJ_Cy\u0026q=85\u0026s=3ab46876df891935607077352b8c8f23","href":"/"},"favicon":"https://mintcdn.com/studystash-help/UbXlxW0z5agaJ_Cy/images/android-chrome-512x512.png?fit=max\u0026auto=format\u0026n=UbXlxW0z5agaJ_Cy\u0026q=85\u0026s=5bbbe16cd63c9616be8af0a2be969361","appearance":{"default":"light","strict":true},"background":{"color":{"light":"#FFFFFF","dark":"#0C1624"}},"navbar":{"links":[{"href":"/support","label":"Support"}],"primary":{"type":"button","label":"Open StudyStash","href":"https://studystash.com"}},"footer":{"links":[{"header":"StudyStash","items":[{"label":"Website","href":"https://studystash.com"},{"label":"Trust centre","href":"https://trust.studystash.com"},{"label":"Status","href":"https://status.studystash.com"},{"label":"Support requests","href":"https://internal.support.studystash.com/servicedesk/customer/portal/34"}]}]},"search":{"prompt":"Search help guides…"},"fonts":{"family":"Rethink Sans"},"styling":{"eyebrows":"breadcrumbs","latex":false},"contextual":{"options":[],"display":"header"},"navigation":{"pages":[]}},"deployment":{"deploymentMetadataValue":{"subdomain":"studystash-help","hasAudioNarration":false,"actualSubdomain":"studystash-help","customDomains":["help2.studystash.com"],"gitSource":{"type":"github","owner":"studystashapp","repo":"help-center","deployBranch":"main","contentDirectory":"","isPrivate":true,"mountPath":"","label":""},"chroma":{"latestBuiltDeploymentHistoryId":"6aec2e836ea3dafcfecbbbf9","collectionId":"b81fcb05-5829-47d9-8c78-f860a7ddfa21","liveDeploymentHistoryId":"6aec2e836ea3dafcfecbbbf9","schemaVersion":"v3"},"feedback":{"thumbs":false},"entitlements":{},"buildId":"6aec2e836ea3dafcfecbbbf9","clientVersion":"0.0.4067","searchFilterCounts":[{"language":"default","tag":"Administrators","count":25},{"language":"default","tag":"Students","count":14},{"language":"default","tag":"Instructors","count":12},{"language":"default","tag":"Get started","count":11},{"language":"default","tag":"Integrations","count":11},{"language":"default","tag":"Start here","count":8},{"language":"default","tag":"LMS integrations","count":7},{"language":"default","tag":"Your account","count":6},{"language":"default","tag":"Manage students and staff","count":5},{"language":"default","tag":"Pilots and evaluation","count":4}]},"assistantConfig":{"enableAskAiButton":false,"enableStarterQuestions":false,"enableContextualStarterQuestions":false,"enableAskAiSearchBar":true},"basePath":"","hasChatPermissions":false,"hasWebMcpPermissions":false,"toggles":[{"name":"kill-isr","enabled":true,"variant":{"name":"disabled","enabled":false,"feature_enabled":true},"impressionData":false},{"name":"agent-mintlify-slack","enabled":true,"variant":{"name":"disabled","enabled":false,"feature_enabled":true},"impressionData":false},{"name":"agent-integrations-settings","enabled":true,"variant":{"name":"disabled","enabled":false,"feature_enabled":true},"impressionData":false},{"name":"rbac-expansion","enabled":true,"variant":{"name":"disabled","enabled":false,"feature_enabled":true},"impressionData":false},{"name":"automations-pr-grouping","enabled":true,"variant":{"name":"disabled","enabled":false,"feature_enabled":true},"impressionData":false},{"name":"custom-prefix","enabled":true,"variant":{"name":"disabled","enabled":false,"feature_enabled":true},"impressionData":false},{"name":"analytics-v7","enabled":true,"variant":{"name":"disabled","enabled":false,"feature_enabled":true},"impressionData":false},{"name":"user-flows-analytics","enabled":true,"variant":{"name":"disabled","enabled":false,"feature_enabled":true},"impressionData":false},{"name":"no-publish-flow","enabled":true,"variant":{"name":"disabled","enabled":false,"feature_enabled":true},"impressionData":false},{"name":"workos-onboarding","enabled":true,"variant":{"name":"disabled","enabled":false,"feature_enabled":true},"impressionData":false},{"name":"llms-txt-v2","enabled":true,"variant":{"name":"disabled","enabled":false,"feature_enabled":true},"impressionData":false},{"name":"snapshot-serving-live","enabled":true,"variant":{"name":"disabled","enabled":false,"feature_enabled":true},"impressionData":false},{"name":"stripTemperatureMiddleware","enabled":true,"variant":{"name":"disabled","enabled":false,"feature_enabled":true},"impressionData":false},{"name":"support-platform-pylon-zendesk","enabled":true,"variant":{"name":"disabled","enabled":false,"feature_enabled":true},"impressionData":false},{"name":"snapshot-serving","enabled":true,"variant":{"name":"disabled","enabled":false,"feature_enabled":true},"impressionData":false},{"name":"instant-rollback","enabled":true,"variant":{"name":"disabled","enabled":false,"feature_enabled":true},"impressionData":false},{"name":"granular-notifications-server","enabled":true,"variant":{"name":"disabled","enabled":false,"feature_enabled":true},"impressionData":false},{"name":"granular-notifications","enabled":true,"variant":{"name":"disabled","enabled":false,"feature_enabled":true},"impressionData":false},{"name":"automations-fable","enabled":true,"variant":{"name":"disabled","enabled":false,"feature_enabled":true},"impressionData":false},{"name":"fixed-ai-action-pricing","enabled":true,"variant":{"name":"disabled","enabled":false,"feature_enabled":true},"impressionData":false},{"name":"automation-resolve-merge-conflict","enabled":true,"variant":{"name":"disabled","enabled":false,"feature_enabled":true},"impressionData":false},{"name":"scoped-publishing","enabled":true,"variant":{"name":"disabled","enabled":false,"feature_enabled":true},"impressionData":false},{"name":"mintql","enabled":true,"variant":{"name":"disabled","enabled":false,"feature_enabled":true},"impressionData":false},{"name":"page-level-analytics","enabled":true,"variant":{"name":"disabled","enabled":false,"feature_enabled":true},"impressionData":false},{"name":"editor-version-history-v2","enabled":true,"variant":{"name":"disabled","enabled":false,"feature_enabled":true},"impressionData":false},{"name":"billing-page-v2","enabled":true,"variant":{"name":"disabled","enabled":false,"feature_enabled":true},"impressionData":false},{"name":"full-page-search","enabled":true,"variant":{"name":"disabled","enabled":false,"feature_enabled":true},"impressionData":false},{"name":"workspace-projects","enabled":true,"variant":{"name":"disabled","enabled":false,"feature_enabled":true},"impressionData":false},{"name":"assistant-v5","enabled":true,"variant":{"name":"disabled","enabled":false,"feature_enabled":true},"impressionData":false},{"name":"fork-pr-previews","enabled":true,"variant":{"name":"disabled","enabled":false,"feature_enabled":true},"impressionData":false},{"name":"revalidation-jwt","enabled":true,"variant":{"name":"disabled","enabled":false,"feature_enabled":true},"impressionData":false},{"name":"vite-origin","enabled":true,"variant":{"name":"disabled","enabled":false,"feature_enabled":true},"impressionData":false},{"name":"workos-sso-scim","enabled":true,"variant":{"name":"disabled","enabled":false,"feature_enabled":true},"impressionData":false},{"name":"hobby-abuse-scan","enabled":true,"variant":{"name":"disabled","enabled":false,"feature_enabled":true},"impressionData":false},{"name":"dashboard-inbox","enabled":true,"variant":{"name":"disabled","enabled":false,"feature_enabled":true},"impressionData":false},{"name":"workos-signup","enabled":true,"variant":{"name":"disabled","enabled":false,"feature_enabled":true},"impressionData":false},{"name":"turbopuffer-dual-write","enabled":true,"variant":{"name":"disabled","enabled":false,"feature_enabled":true},"impressionData":false},{"name":"workos-enabled","enabled":true,"variant":{"name":"disabled","enabled":false,"feature_enabled":true},"impressionData":false},{"name":"approve-review-flow","enabled":true,"variant":{"name":"disabled","enabled":false,"feature_enabled":true},"impressionData":false},{"name":"sso-setup-deadline-banner","enabled":true,"variant":{"name":"disabled","enabled":false,"feature_enabled":true},"impressionData":false},{"name":"turbopuffer-serve","enabled":true,"variant":{"name":"disabled","enabled":false,"feature_enabled":true},"impressionData":false},{"name":"live-agents","enabled":true,"variant":{"name":"disabled","enabled":false,"feature_enabled":true},"impressionData":false}],"privacy":{"consentBanner":{"enabled":true}},"googleFontsInlined":true},"customCss":[{"filePath":"custom.css","content":":root,.ss-help-layout{--ss-brand-blue: #004c89;--ss-ink: #132b43;--ss-muted: #536578;--ss-line: #d9e2eb;--ss-surface: #f4f7fa;--ss-canvas: #ffffff;--ss-paper: #ffffff;--ss-accent: var(--ss-brand-blue);--ss-blue: var(--ss-brand-blue);--ss-tint: #e4edf3;--ss-on-accent: #ffffff}.dark{--ss-ink: #edf3fa;--ss-muted: #b6c5d6;--ss-line: #2c4058;--ss-surface: #1b2d43;--ss-canvas: #0c1624;--ss-paper: #142438;--ss-accent: #93bce8;--ss-blue: #93bce8;--ss-tint: #1d3550;--ss-on-accent: #0c1624}body:has(.ss-help-layout) #content-area{padding:0}.ss-help-layout{min-height:100vh;display:flex;flex-direction:column;overflow:clip;color:var(--ss-ink);background:var(--ss-canvas);font-family:\"Rethink Sans\", sans-serif;font-size:15px;line-height:1.55}.ss-help-layout *{box-sizing:border-box}.ss-help-layout :is(h1,h2,h3,p,ul){margin:0}.ss-help-layout a{color:inherit;text-decoration:none}.ss-help-layout a:hover{color:var(--ss-accent)}.ss-help-layout :is(a,button,input):focus-visible{outline:3px solid var(--ss-accent);outline-offset:5px}.ss-help-layout h1{font-size:48px;line-height:1.12;letter-spacing:-1.7px;font-weight:600;color:var(--ss-ink)}.ss-help-layout h2{font-size:25px;line-height:1.25;letter-spacing:-.65px;font-weight:600}.ss-help-header{border-bottom:1px solid var(--ss-line)}.ss-header-inner,.ss-footer-inner{max-width:1220px;padding:23px 40px;margin:0 auto;display:flex;align-items:center;justify-content:space-between;gap:24px}.ss-help-brand{display:flex;align-items:center;gap:18px;flex-shrink:0}.ss-help-brand img{display:block;width:153px;height:auto;margin:0}.ss-help-brand .ss-help-logo-dark{display:none}.dark .ss-help-brand .ss-help-logo-light{display:none}.dark .ss-help-brand .ss-help-logo-dark{display:block}.ss-help-brand>span{padding-left:18px;border-left:1px solid var(--ss-line);color:var(--ss-muted);font-size:13px}.ss-help-header-links{display:flex;align-items:center;gap:26px;font-size:13px;font-weight:500}.ss-help-open{display:inline-flex;align-items:center;justify-content:center;gap:10px;min-height:44px;border:1px solid var(--ss-brand-blue);padding:10px 16px;border-radius:8px;font-weight:600;white-space:nowrap}.ss-help-layout a.ss-help-open{background:var(--ss-brand-blue);color:#fff;box-shadow:0 1px 2px #132b4314;transition:background-color .15s ease}.ss-help-layout a.ss-help-open:hover{background:#003d6e;border-color:#003d6e;color:#fff}.ss-help-open svg{flex:0 0 auto}.ss-help-content{width:100%;max-width:1140px;flex:1;isolation:isolate;margin:0 auto;padding:0 40px}.ss-eyebrow{color:var(--ss-accent);font-size:12px;font-weight:600;letter-spacing:.03em}.ss-home-hero{display:grid;grid-template-columns:1fr 1.1fr;align-items:center;gap:40px;padding:18px 0;margin:42px 0 44px}.ss-home-hero h1{font-size:43px;letter-spacing:-1.5px}.ss-home-hero .ss-search{max-width:610px;margin:0 auto;text-align:left}.ss-search{position:relative;width:100%;text-align:left}.ss-search-launcher{display:flex;align-items:center;gap:12px;width:100%;min-height:58px;padding:8px 9px 8px 18px;border:1px solid var(--ss-line);border-radius:9px;background:var(--ss-paper);box-shadow:0 3px 8px #16353106;color:var(--ss-ink);font:inherit;text-align:left;cursor:pointer}.ss-search-launcher:hover{border-color:var(--ss-accent)}.ss-search-launcher:focus-visible{outline:2px solid var(--ss-accent);outline-offset:3px}.ss-search-launcher>svg{width:20px;height:20px;flex-shrink:0;color:var(--ss-accent)}.ss-search-placeholder{flex:1;min-width:0;color:var(--ss-muted);font-size:15px}.ss-search-action{border-radius:6px;padding:11px 18px;background:var(--ss-accent);color:var(--ss-on-accent);font-size:13px;font-weight:500}.ss-section-heading{display:flex;align-items:flex-end;justify-content:space-between;gap:20px;margin-bottom:22px}.ss-section-heading p{color:var(--ss-muted);font-size:14px;margin-top:7px}.ss-help-layout a.ss-help-link{display:inline-flex;align-items:center;gap:12px;color:var(--ss-accent);font-size:13px;font-weight:500}.ss-audience-grid{display:grid;grid-template-columns:repeat(3,minmax(0,1fr));gap:24px}.ss-audience-card{display:block;min-width:0;overflow:hidden;border:1px solid var(--ss-line);border-radius:10px}.ss-audience-card:hover{border-color:var(--ss-accent)}.ss-audience-copy{padding:24px}.ss-audience-copy h3{font-size:25px;font-weight:600;line-height:1.2;letter-spacing:-.7px}.ss-audience-copy p{font-size:14px;line-height:1.6;color:var(--ss-muted);margin:10px 0 0;min-height:44px}.ss-help-support{display:flex;align-items:center;gap:20px;padding:29px 32px;margin:30px 0 44px;border-radius:12px;background:var(--ss-tint)}.ss-help-support h2{font-size:23px;letter-spacing:-.5px;margin-bottom:6px}.ss-help-support p{color:var(--ss-muted);font-size:14px}.ss-help-button{display:inline-flex;align-items:center;justify-content:center;gap:22px;border:1px solid var(--ss-accent);padding:12px 18px;border-radius:7px;font-size:13px;font-weight:500;white-space:nowrap;min-height:44px}.ss-help-support .ss-help-button{margin-left:auto;background:var(--ss-accent);color:var(--ss-on-accent)}.ss-help-layout .ss-help-button:hover{color:var(--ss-accent);background:var(--ss-paper)}.ss-help-footer{border-top:1px solid var(--ss-line);color:var(--ss-muted);font-size:12px}.ss-footer-inner{padding-top:25px;padding-bottom:27px;align-items:flex-start}.ss-footer-inner>a{flex-shrink:0;font-weight:500;color:var(--ss-ink)}.ss-help-footer nav{display:flex;justify-content:flex-end;flex-wrap:wrap;gap:10px 22px}.ss-help-breadcrumb{display:flex;flex-wrap:wrap;align-items:center;gap:11px;margin:25px 0 19px;color:var(--ss-muted);font-size:13px}.ss-role-hero{position:relative;padding:44px 0 38px}.ss-role-hero-copy{max-width:620px;margin:0 auto;text-align:center}.ss-role-hero h1{color:white;font-size:43px;margin:0}.ss-role-hero h1+p{color:#e4edf3;margin-top:13px}.ss-role-hero .ss-search{margin-top:25px}.ss-role-start{position:relative;display:flex;align-items:center;justify-content:space-between;gap:24px;padding:26px 28px;margin:0 0 26px;border:1px solid var(--ss-line);border-radius:10px;background:var(--ss-paper);box-shadow:0 3px 12px #132b4308}.ss-role-start h2{font-size:23px;margin:6px 0}.ss-role-start p:not(.ss-eyebrow){font-size:14px;color:var(--ss-muted)}.ss-topic-nav{display:flex;flex-wrap:wrap;gap:8px;padding:0 0 25px}.ss-topic-nav a{display:block;padding:7px 13px;border:1px solid var(--ss-line);border-radius:6px;color:var(--ss-muted);font-size:13px}.ss-topic-nav a:hover{background:var(--ss-tint)}.ss-role-sections{display:grid;grid-template-columns:repeat(2,minmax(0,1fr));gap:24px;margin:0 0 48px}.ss-role-section{border:1px solid var(--ss-line);border-radius:10px;background:var(--ss-paper);padding:25px 26px 12px}.ss-role-section h2{font-size:21px;font-weight:600;margin-bottom:20px;letter-spacing:-.45px;scroll-margin-top:25px}.ss-role-section ul{list-style:none;padding:0}.ss-role-section li{margin:0;padding:0}.ss-role-section li a{display:flex;align-items:center;justify-content:space-between;gap:20px;padding:14px 0;border-top:1px solid var(--ss-line);font-size:14px;min-height:49px}.ss-role-section li a span:last-child{flex-shrink:0;color:var(--ss-accent)}.ss-role-section:last-child:nth-child(odd){grid-column:1 / -1}.ss-role-section:last-child:nth-child(odd) ul{display:grid;grid-template-columns:repeat(2,minmax(0,1fr));column-gap:36px}@media (max-width: 1000px){.ss-header-inner,.ss-footer-inner,.ss-help-content{padding-left:28px;padding-right:28px}.ss-audience-grid{gap:16px}.ss-audience-copy{padding:20px 18px}.ss-audience-copy h3{font-size:23px}.ss-role-hero h1{font-size:36px}}@media (max-width: 760px){.ss-help-brand>span{display:none}.ss-home-hero{grid-template-columns:1fr;gap:22px}.ss-home-hero h1{font-size:36px}.ss-audience-grid{grid-template-columns:1fr;gap:22px}.ss-audience-card{display:grid;grid-template-columns:124px minmax(0,1fr);align-items:center}.ss-audience-copy p{min-height:0}.ss-role-hero{padding:32px 0}.ss-role-sections{gap:18px}.ss-role-section{padding:22px 20px 9px}.ss-footer-inner{flex-direction:column;gap:16px}.ss-help-footer nav{justify-content:flex-start}}@media (max-width: 520px){.ss-header-inner{padding:17px 20px;gap:14px}.ss-help-brand img{width:139px}.ss-help-header-links{font-size:12px;gap:12px}.ss-header-inner{flex-wrap:wrap}.ss-help-header-links{width:100%;justify-content:space-between}.ss-help-content{padding:0 20px}.ss-home-hero{padding:0;margin:32px 0;gap:22px}.ss-home-hero h1{font-size:32px;letter-spacing:-1px;margin-top:9px}.ss-search-launcher{padding:6px 7px 6px 11px;gap:9px}.ss-search-placeholder{font-size:16px}.ss-search-action{padding:10px 12px}.ss-section-heading{align-items:flex-start;flex-direction:column;gap:13px}.ss-section-heading h2{font-size:25px}.ss-section-heading p{font-size:13px}.ss-audience-card{grid-template-columns:88px minmax(0,1fr)}.ss-audience-copy{padding:20px 18px}.ss-audience-copy h3{font-size:21px}.ss-audience-copy p{font-size:13px;margin-top:7px;margin-bottom:0}.ss-help-support{flex-direction:column;align-items:flex-start;padding:24px;margin:20px 0 30px;gap:18px}.ss-help-support h2{font-size:23px}.ss-help-support .ss-help-button{margin-left:0}.ss-footer-inner{padding:24px 20px}.ss-help-footer nav{gap:13px 19px}.ss-help-breadcrumb{font-size:12px;margin:22px 0 17px}.ss-role-hero h1{font-size:32px;letter-spacing:-1px}.ss-role-hero h1+p{font-size:14px}.ss-role-start{flex-direction:column;align-items:flex-start;gap:17px;padding:24px 20px}.ss-role-sections,.ss-role-section:last-child:nth-child(odd) ul{grid-template-columns:1fr}.ss-role-section{padding:22px 20px 8px}.ss-topic-nav{gap:7px;padding:18px 0 22px}.ss-topic-nav a{font-size:12px}}.ss-audience-nav{display:flex;align-items:center;gap:26px;max-width:1220px;margin:0 auto;padding:0 40px 14px;font-size:13px}.ss-audience-nav a{padding:6px 0;color:var(--ss-muted);border-bottom:2px solid transparent}.ss-audience-nav a[aria-current=\"page\"]{color:var(--ss-accent);border-color:var(--ss-accent);font-weight:600}.ss-audience-copy h3{display:flex;align-items:center;justify-content:space-between;gap:12px}.ss-audience-copy h3>span{color:var(--ss-accent);font-size:23px;font-weight:400}#content [data-component-part=\"step-indicator\"]{background:var(--ss-tint);color:var(--ss-accent);font-size:13px}#content [data-component-part=\"step-title\"]{font-size:19px;line-height:1.4;font-weight:600;color:var(--ss-ink);letter-spacing:-.25px}#content [data-component-part=\"step-line\"]{background:var(--ss-line)}#header .breadcrumb-list{flex-wrap:wrap}#header .breadcrumb-list a{color:var(--ss-accent)}@media (min-width: 1001px){.ss-help-header{position:relative}.ss-audience-nav{position:absolute;top:23px;left:50%;transform:translateX(-50%);padding:6px 0;gap:24px}}.ss-product-visual{display:flex;align-items:center;justify-content:center;height:170px;overflow:hidden;padding:24px;border-radius:9px 9px 0 0;background:var(--ss-surface)}.ss-product-window{display:block;flex-shrink:0;width:100%;max-width:340px;height:auto;overflow:hidden;border-radius:8px;box-shadow:0 2px 10px #16353108}.ss-product-students .ss-product-window{width:158px;height:124px;background:white}.ss-product-educators .ss-product-window{background:white}.ss-product-administrators .ss-product-window{max-width:196px}.ss-role-hero>.ss-product-visual{height:100%;min-height:260px;border-radius:9px}.ss-role-hero .ss-product-students .ss-product-window{width:230px;height:180px}.ss-role-hero .ss-product-administrators .ss-product-window{max-width:330px}@media (max-width: 1000px){.ss-audience-nav{padding-left:28px;padding-right:28px}.ss-home-hero{gap:24px}.ss-home-hero h1{font-size:36px}.ss-product-visual{height:162px;padding:18px}.ss-audience-copy p{min-height:44px}}@media (max-width: 760px){.ss-audience-card .ss-product-visual{height:100%;min-height:124px;padding:14px;border-radius:0}.ss-audience-card .ss-product-window{max-width:100%;height:auto}.ss-audience-copy p{min-height:0}.ss-role-hero>.ss-product-visual{display:none}}@media (max-width: 520px){.ss-header-inner{padding-bottom:10px}.ss-audience-nav{padding:0 20px 9px;gap:0;justify-content:space-between;font-size:12px}.ss-audience-nav a{min-height:44px;display:flex;align-items:center}.ss-home-hero{padding:0;gap:22px}.ss-home-hero h1{font-size:32px}.ss-audience-card .ss-product-visual{min-height:118px;padding:10px}}html:has(.ss-help-layout),body:has(.ss-help-layout){color-scheme:light;background:#ffffff}.ss-help-layout .ss-help-brand .ss-help-logo-light{display:block}.ss-help-layout .ss-help-brand .ss-help-logo-dark{display:none}.ss-help-layout-home .ss-home-hero{position:relative;display:flex;flex-direction:column;gap:25px;padding:44px 0 38px;margin:0;text-align:center}.ss-help-layout-home .ss-home-hero::before,.ss-help-layout-audience .ss-role-hero::before{content:'';position:absolute;z-index:-1;top:0;bottom:-135px;left:50%;width:100vw;transform:translateX(-50%);background:var(--ss-brand-blue)}.ss-help-layout-audience .ss-role-hero::before{bottom:-65px}.ss-help-layout-home .ss-home-hero h1{color:white}.ss-help-layout-home .ss-home-hero .ss-search{max-width:620px}.ss-help-layout-home .ss-audiences{position:relative;padding-bottom:52px}.ss-help-layout-home .ss-directory-heading{color:white;font-size:17px;font-weight:500;letter-spacing:-.25px;margin:0 0 20px}.ss-help-layout-home .ss-audience-card{display:block;background:var(--ss-paper);border-color:var(--ss-line);box-shadow:0 3px 12px #132b4308}.ss-help-layout-home .ss-audience-card:hover{border-color:var(--ss-accent)}.ss-help-layout-home .ss-audience-card .ss-product-visual{height:270px;min-height:0;padding:18px;border-radius:9px 9px 0 0}.ss-help-layout-home .ss-audience-card .ss-product-window{width:100%;max-width:min(300px, 100%);height:auto}.ss-help-layout-home .ss-product-students .ss-product-window{width:234px;aspect-ratio:1}.ss-help-layout-home .ss-product-administrators .ss-product-window{width:300px;max-width:100%;box-shadow:none;border-radius:0}.ss-help-layout-home .ss-audience-copy{padding:22px 24px}.ss-help-layout .ss-footer-inner{padding-top:25px;padding-bottom:25px}#footer.advanced-footer{width:100%;border-color:var(--ss-line);background:var(--ss-canvas);color:var(--ss-muted)}#footer.advanced-footer>div{max-width:1220px;padding:28px 40px;gap:16px}#footer.advanced-footer>div>div:first-child{align-items:center;gap:24px}#footer.advanced-footer>div>div:first-child>div{min-width:0;flex:0 1 auto}#footer.advanced-footer>div>div:first-child>div:last-child{display:block}#footer.advanced-footer .nav-logo{width:153px;max-width:100%;height:auto}#footer.advanced-footer>div>div:first-child div:has(>a[href^=\"https://\"]){display:flex;flex-direction:row;flex-wrap:wrap;justify-content:flex-end;gap:8px 24px}#footer.advanced-footer>div>div:first-child a[href^=\"https://\"]{display:inline-flex;align-items:center;min-height:32px;max-width:none;white-space:nowrap;color:var(--ss-muted);font-size:13px}#footer.advanced-footer>div>div:nth-child(2){background:var(--ss-line)}#footer.advanced-footer>div>div:last-child{gap:20px}#footer.advanced-footer>div>div:last-child a{color:var(--ss-muted);font-size:12px}#footer.advanced-footer>div>div:last-child a svg{height:12px}#footer.advanced-footer>div>div a[href]:hover{color:var(--ss-accent)}#footer.advanced-footer button[aria-pressed]{width:36px;height:36px;padding:10px;border-radius:6px;color:var(--ss-muted)}#footer.advanced-footer button[aria-pressed=\"true\"]{background:var(--ss-tint);color:var(--ss-accent)}#footer.advanced-footer button[aria-pressed]:hover{background:var(--ss-tint);color:var(--ss-accent)}#footer.advanced-footer :is(a,button):focus-visible{outline:2px solid var(--ss-accent);outline-offset:4px}@media (max-width: 1000px){#footer.advanced-footer>div{padding-left:28px;padding-right:28px}}@media (max-width: 760px){#footer.advanced-footer>div{padding:24px 20px}#footer.advanced-footer>div>div:first-child{flex-direction:column;align-items:flex-start;gap:16px}#footer.advanced-footer>div>div:first-child div:has(>a[href^=\"https://\"]){justify-content:flex-start;gap:4px 20px}#footer.advanced-footer>div>div:last-child{gap:12px}#footer.advanced-footer>div>div:last-child>div:last-child{gap:4px}}@media (max-width: 760px){.ss-help-layout-home .ss-audiences{padding-bottom:36px}.ss-help-layout-home .ss-audience-grid{gap:12px;max-width:480px;margin:0 auto}.ss-help-layout-home .ss-home-hero{padding:24px 0;gap:18px}.ss-help-layout-home .ss-home-hero::before{bottom:-100px}.ss-help-layout-home .ss-directory-heading{max-width:480px;margin-left:auto;margin-right:auto}.ss-help-layout-home .ss-audience-card{display:grid;grid-template-columns:96px minmax(0, 1fr);align-items:stretch}.ss-help-layout-home .ss-audience-card .ss-product-visual{height:100%;min-height:116px;padding:10px;border-radius:0}.ss-help-layout-home .ss-audience-card .ss-product-window{width:100%;max-width:100%}.ss-help-layout-home .ss-audience-copy{align-self:center;padding:17px 16px}.ss-help-layout-home .ss-audience-copy h3{font-size:20px;letter-spacing:-.4px;gap:8px}.ss-help-layout-home .ss-audience-copy p{margin-top:6px;min-height:0;font-size:13px;line-height:1.5}}@media (max-width: 520px){.ss-help-layout-home .ss-header-inner{padding-bottom:17px}.ss-help-layout-home .ss-directory-heading{font-size:16px;margin-bottom:16px}.ss-audience-copy h3>span{font-size:20px}}@media (max-width: 360px){.ss-audience-card{grid-template-columns:64px minmax(0,1fr)}.ss-help-layout-home .ss-audience-card{grid-template-columns:64px minmax(0,1fr)}.ss-help-layout-home .ss-audience-copy{padding-left:12px;padding-right:12px}.ss-help-layout-home .ss-audience-copy h3{font-size:18px}.ss-audience-copy{padding-left:15px;padding-right:15px}.ss-audience-copy h3{font-size:20px}}img[src*=\"/assets/lms/canvas.png\"]{transform:scale(1.4);clip-path:inset(16%)}img[src*=\"/assets/lms/moodle.png\"]{transform:scale(1.12)}.ss-announcement{margin:16px 0 28px;padding:20px;border:1px solid var(--ss-line);border-radius:8px;background:var(--ss-paper)}.ss-announcement-tools{display:flex;flex-wrap:wrap;align-items:center;justify-content:flex-end;gap:8px 12px;margin-bottom:16px}.ss-announcement-tools button{display:inline-flex;align-items:center;gap:8px;min-height:40px;padding:8px 12px;border:1px solid var(--ss-line);border-radius:6px;background:var(--ss-surface);color:var(--ss-accent);font-size:13px;font-weight:600;cursor:pointer}.ss-announcement-tools button:hover{border-color:var(--ss-accent)}.ss-announcement-tools button:focus-visible{outline:2px solid var(--ss-accent);outline-offset:3px}.ss-announcement-tools [role=\"status\"]{font-size:12px;color:var(--ss-muted)}.ss-announcement-content{font-size:15px;line-height:1.7;overflow-wrap:anywhere}.ss-announcement-content>[data-as=\"p\"]{display:block;margin:14px 0}.ss-announcement-content>:first-child{margin-top:0}.ss-announcement-content>:last-child{margin-bottom:0}body:not(:has(.ss-help-layout)) #header{padding-bottom:24px;margin-bottom:28px;border-bottom:1px solid var(--ss-line)}body:not(:has(.ss-help-layout)) #header h1{color:var(--ss-ink);font-weight:600;font-size:clamp(30px, 3vw, 40px);line-height:1.15;letter-spacing:-1px}body:not(:has(.ss-help-layout)) #header .prose{color:var(--ss-muted);line-height:1.65}body:not(:has(.ss-help-layout)) #content{--tw-prose-headings: var(--ss-ink);--tw-prose-links: var(--ss-accent);line-height:1.8}body:not(:has(.ss-help-layout)) #content h2{font-size:25px;line-height:1.3;letter-spacing:-.5px;font-weight:600}body:not(:has(.ss-help-layout)) #content h3{color:var(--ss-ink);font-size:20px;line-height:1.4;font-weight:600}.ss-article-screenshot{margin:24px 0;max-width:680px;border:1px solid var(--ss-line);border-radius:10px;overflow:hidden;background:var(--ss-surface)}.ss-article-screenshot .ss-screenshot-crop{display:block;width:100%;height:auto;background:white}.ss-article-screenshot figcaption{display:flex;flex-wrap:wrap;justify-content:space-between;gap:8px 18px;padding:13px 16px;border-top:1px solid var(--ss-line);font-size:13px;line-height:1.5;color:var(--ss-muted)}.ss-article-screenshot figcaption a{color:var(--ss-accent);font-weight:500;text-decoration:underline;text-underline-offset:3px}.ss-article-screenshot a:focus-visible{outline:3px solid var(--ss-accent);outline-offset:-3px}.ss-article-screenshot.ss-crop-menu{max-width:370px}.ss-article-screenshot.ss-crop-sharing{max-width:520px}.ss-screenshot{border-radius:10px}.ss-video{border-radius:10px}@media (max-width: 520px){body:not(:has(.ss-help-layout)) #header{padding-bottom:20px;margin-bottom:24px}body:not(:has(.ss-help-layout)) #content h2{font-size:23px}}.ss-video{margin:28px 0;overflow:hidden;border:1px solid var(--ss-line);border-radius:10px;background:var(--ss-surface)}.ss-video video{display:block;width:100%;height:auto;max-height:520px;margin:0;background:#eaf0f4;border-radius:0}.ss-video figcaption{padding:13px 16px;display:flex;justify-content:space-between;align-items:baseline;flex-wrap:wrap;gap:4px 12px;color:var(--ss-ink);font-size:13px;line-height:1.5}.ss-video figcaption span{color:var(--ss-muted);font-size:11px;white-space:nowrap}.ss-checklist,.ss-finder{border:1px solid var(--ss-line);padding:24px;border-radius:6px;margin:24px 0;background:var(--ss-surface);color:var(--ss-ink)}.ss-checklist-heading{display:flex;flex-wrap:wrap;justify-content:space-between;gap:10px;align-items:center}.ss-checklist-heading h3{margin:0;font-size:18px;font-weight:700}.ss-checklist-heading span{color:var(--ss-muted);font-size:12px}.ss-checklist progress{display:block;width:100%;height:7px;accent-color:#087b79;margin:16px 0;border:0;border-radius:5px;overflow:hidden}.ss-checklist progress::-webkit-progress-bar{background:#cfe1e3}.ss-checklist progress::-webkit-progress-value{background:#087b79}.ss-checklist ul{list-style:none;padding:0;margin:0}.ss-checklist li{display:flex;align-items:start;gap:14px;padding:18px 0;border-bottom:1px solid var(--ss-line)}.ss-checklist li:last-child{border:0}.ss-checklist input{width:20px;height:20px;margin-top:2px;accent-color:#087b79;flex:0 0 auto}.ss-checklist label{cursor:pointer;font-size:15px;font-weight:650}.ss-checklist li p{margin:5px 0;color:var(--ss-muted);font-size:13px;line-height:1.6}.ss-checklist a,.ss-finder a{color:var(--ss-blue);font-size:13px;font-weight:650}.ss-small{font-size:12px;color:var(--ss-muted);line-height:1.6;margin-top:16px}.ss-complete{color:var(--ss-accent);font-weight:650;font-size:14px}.ss-finder fieldset{border:0;padding:0;margin:0 0 24px;min-width:0}.ss-finder legend{font-size:16px;font-weight:650;margin-bottom:14px}.ss-choices{display:flex;flex-wrap:wrap;gap:10px}.ss-choices button{text-align:left;font-size:14px;padding:12px 16px;border-radius:5px;border:1px solid var(--ss-line);background:transparent;color:var(--ss-ink);cursor:pointer}.ss-choices button[aria-pressed=\"true\"]{color:#fff;border-color:#086c72;background:#086c72}.ss-finder-result{border-top:1px solid var(--ss-line);padding-top:20px}.ss-finder-result h3{margin:0 0 8px;font-size:18px;font-weight:700}.ss-finder-result p{color:var(--ss-muted);font-size:14px;line-height:1.7}.ss-finder-result ul{list-style:none;margin:14px 0 0;padding:0;display:grid;gap:12px}.ss-finder :is(a,button):focus-visible,.ss-checklist :is(a,input):focus-visible{outline:3px solid #159897;outline-offset:4px;border-radius:5px}.ss-route-card{border-radius:6px!important}.ss-route-card h2{font-size:18px}#content-area h2{letter-spacing:-.02em}#content-area h3{letter-spacing:-.015em}.ss-transcript{padding:0 16px 14px;font-size:13px;color:var(--ss-muted)}.ss-transcript summary{cursor:pointer;color:var(--ss-blue);font-weight:600}.ss-transcript p{margin:14px 0 0;line-height:1.8}.ss-screenshot{border-radius:10px;border-color:var(--ss-line);background:var(--ss-surface)}.ss-screenshot img{border-radius:3px}#topbar-cta-button{background:transparent}#topbar-cta-button a>span{background:var(--ss-brand-blue);border-radius:7px}@media (max-width: 480px){.ss-checklist,.ss-finder{padding:18px}.ss-choices{flex-direction:column}.ss-choices button{width:100%}.ss-video figcaption{padding:10px 12px}}#navbar{color:var(--ss-ink)}#navbar-transition{background:#ffffff;border-color:var(--ss-line);backdrop-filter:none}#navbar a:has(>.nav-logo){display:flex;align-items:center;flex-shrink:0;gap:16px}#navbar a:has(>.nav-logo)::after{content:\"Help centre\";padding-left:16px;border-left:1px solid var(--ss-line);color:var(--ss-muted);font-size:14px;font-weight:400;white-space:nowrap}#navbar .nav-logo{width:153px;height:auto}#navbar #search-bar-entry{max-width:400px;height:40px;border:1px solid var(--ss-line);border-radius:7px;background:var(--ss-surface);color:var(--ss-muted);box-shadow:none}#navbar #search-bar-entry:hover{border-color:#9aafc2;background:#edf2f6}#navbar [data-search-item=\"trigger-icon\"]{color:var(--ss-muted)}#navbar [data-search-item=\"trigger-hint\"]{border:1px solid var(--ss-line);border-radius:4px;padding:0 5px;background:white;color:var(--ss-muted);font-weight:400}#navbar .navbar-link a{min-height:40px;padding:0 8px;color:var(--ss-muted);font-weight:500}#navbar .navbar-link a:hover{color:var(--ss-brand-blue)}#navbar #topbar-cta-button>a{min-height:40px;padding:9px 15px;border-radius:7px;background:var(--ss-brand-blue);color:white;box-shadow:0 1px 2px #132b4314}#navbar #topbar-cta-button>a:hover{background:#003d6e}#navbar #topbar-cta-button>a>span{display:none}#navbar #topbar-cta-button>a>div{gap:8px}#navbar .nav-tabs{align-items:center;gap:6px}#navbar .nav-tabs-item{height:36px;padding:0 14px;border-radius:6px;color:var(--ss-muted);font-size:14px;text-shadow:none}#navbar .nav-tabs-item:hover{background:var(--ss-surface);color:var(--ss-brand-blue)}#navbar .nav-tabs-item[data-active=\"true\"]{background:var(--ss-tint);color:var(--ss-brand-blue);font-weight:600}#navbar .nav-tabs-item>div{display:none}#navbar :is(a,button):focus-visible{outline:2px solid var(--ss-brand-blue);outline-offset:3px}#navbar #search-bar-entry-mobile,#navbar button[aria-label=\"More actions\"]{width:40px;height:40px;border-radius:7px;color:var(--ss-muted)}#navbar #search-bar-entry-mobile:hover,#navbar button[aria-label=\"More actions\"]:hover{background:var(--ss-surface)}#navbar button[aria-label=\"More actions\"]::after{inset:0}@media (min-width: 1024px){body:has(.ss-help-layout-home) #search-bar-entry{visibility:hidden}}@media (max-width: 600px){#navbar .nav-logo{width:140px}#navbar a:has(>.nav-logo)::after{display:none}}#navbar button:has(>div>.sr-only)>div:last-child>div:first-child{display:none}nav[aria-label=\"Mobile menu\"] a{min-height:44px;color:var(--ss-ink)}nav[aria-label=\"Mobile menu\"] a[href=\"https://studystash.com\"]{margin-top:4px;border-radius:7px;background:var(--ss-brand-blue);color:white}nav[aria-label=\"Mobile menu\"] a[href=\"https://studystash.com\"]:hover{background:#003d6e}nav[aria-label=\"Mobile menu\"] a:focus-visible{outline:2px solid var(--ss-brand-blue);outline-offset:3px}.ss-setup-table{container-type:inline-size;margin:24px 0;color:var(--ss-ink);font-size:14px;line-height:1.6}.ss-setup-table table{width:100%;table-layout:fixed;border-collapse:collapse;text-align:left}.ss-setup-table th,.ss-setup-table td{padding:14px 12px;border-bottom:1px solid var(--ss-line);vertical-align:top;overflow-wrap:anywhere}.ss-setup-table thead th{background:var(--ss-surface);font-weight:600}.ss-setup-table th:first-child{width:30%}.ss-setup-table tbody th{font-weight:500}.ss-setup-value{min-width:0}.ss-setup-value code{background:none;border:0;padding:0;display:block;font-size:13px;line-height:1.7;white-space:normal;overflow-wrap:anywhere;color:var(--ss-ink)}.ss-setup-value button{display:inline-flex;align-items:center;min-height:36px;margin-top:6px;padding:4px 10px;border:1px solid var(--ss-line);border-radius:5px;background:var(--ss-paper);color:var(--ss-accent);font:inherit;font-size:12px;font-weight:600;cursor:pointer}.ss-setup-value button:hover{border-color:var(--ss-accent);background:var(--ss-surface)}.ss-setup-value button:focus-visible,a.ss-request-action:focus-visible{outline:2px solid var(--ss-accent);outline-offset:3px}.ss-copy-status{margin-top:8px;color:var(--ss-muted);font-size:13px}.ss-visually-hidden{position:absolute;width:1px;height:1px;padding:0;margin:-1px;overflow:hidden;clip-path:inset(50%);white-space:nowrap;border:0}#content a.ss-request-action{display:inline-flex;align-items:center;min-height:44px;margin:8px 0 18px;padding:10px 16px;border:0;border-radius:7px;background:var(--ss-brand-blue);color:white;font-weight:600;text-decoration:none}#content a.ss-request-action:hover{background:#003d6e}@media (max-width: 600px){.ss-setup-table table,.ss-setup-table tbody,.ss-setup-table tr,.ss-setup-table tbody th,.ss-setup-table td{display:block;width:100%}.ss-setup-table thead{position:absolute;width:1px;height:1px;overflow:hidden;clip-path:inset(50%)}.ss-setup-table tbody tr{padding:14px 0;border-bottom:1px solid var(--ss-line)}.ss-setup-table tbody th,.ss-setup-table td{padding:0;border:0}.ss-setup-table tbody th:first-child{width:100%;margin-bottom:6px;font-weight:600}.ss-setup-table td+td{margin-top:12px}.ss-setup-table td::before{content:attr(data-label);display:block;margin-bottom:4px;color:var(--ss-muted);font-size:12px}.ss-setup-value button{min-height:44px;padding:6px 14px}}@container (max-width: 600px){.ss-setup-wide,.ss-setup-wide tbody,.ss-setup-wide tr,.ss-setup-wide tbody th,.ss-setup-wide td{display:block;width:100%}.ss-setup-wide thead{position:absolute;width:1px;height:1px;overflow:hidden;clip-path:inset(50%)}.ss-setup-wide tbody tr{padding:14px 0;border-bottom:1px solid var(--ss-line)}.ss-setup-wide tbody th,.ss-setup-wide td{padding:0;border:0}.ss-setup-wide tbody th:first-child{width:100%;margin-bottom:8px;font-weight:600}.ss-setup-wide td+td{margin-top:12px}.ss-setup-wide td::before{content:attr(data-label);display:block;margin-bottom:4px;color:var(--ss-muted);font-size:12px}}.tab-container:has(>.ss-lms-access-tabs){container-type:inline-size}.ss-lms-access-tabs [role=\"tab\"]:focus-visible{outline:2px solid var(--ss-accent);outline-offset:3px;border-radius:5px}@container (max-width: 460px){.ss-lms-access-tabs{display:grid;grid-template-columns:repeat(2, minmax(0, 1fr));gap:8px;overflow:visible;border-bottom:0}.ss-lms-access-tabs [data-component-part=\"tab-button\"]{justify-content:center;max-width:none;min-height:44px;margin:0;padding:9px 8px;border:1px solid var(--ss-line);border-radius:7px;color:var(--ss-ink)}.ss-lms-access-tabs [data-active=\"true\"]{border-color:var(--ss-accent);background:var(--ss-tint);color:var(--ss-accent)}}"}],"page":{"pagePath":"integrations/microsoft-entra-id","slug":"/integrations/microsoft-entra-id","pageMetadata":{"icon":"/assets/integrations/microsoft-entra.svg","title":"Set up Microsoft Entra ID","sidebarTitle":"Microsoft Entra ID","description":"Configure the StudyStash enterprise application for SAML single sign-on.","href":"/integrations/microsoft-entra-id"},"description":{"compiledSource":"\"use strict\";\nconst {jsx: _jsx} = arguments[0];\nconst {useMDXComponents: _provideComponents} = arguments[0];\nfunction _createMdxContent(props) {\n const _components = {\n p: \"p\",\n ..._provideComponents(),\n ...props.components\n };\n return _jsx(_components.p, {\n children: \"Configure the StudyStash enterprise application for SAML single sign-on.\"\n });\n}\nfunction MDXContent(props = {}) {\n const {wrapper: MDXLayout} = {\n ..._provideComponents(),\n ...props.components\n };\n return MDXLayout ? _jsx(MDXLayout, {\n ...props,\n children: _jsx(_createMdxContent, {\n ...props\n })\n }) : _createMdxContent(props);\n}\nreturn {\n default: MDXContent\n};\n","frontmatter":{},"scope":{}},"pageType":"default","mdx":{"mdxSource":{"compiledSource":"\"use strict\";const{Fragment:_Fragment,jsx:_jsx,jsxs:_jsxs}=arguments[0];const{useMDXComponents:_provideComponents}=arguments[0];const ArticleScreenshot=({src,alt,caption,viewBox,width,height,className=``})=>_jsxs(`figure`,{className:`ss-article-screenshot not-prose `+className,children:[_jsx(`svg`,{className:`ss-screenshot-crop`,viewBox,role:`img`,\"aria-label\":alt,focusable:`false`,children:_jsx(`image`,{href:src,width,height})}),_jsx(`figcaption`,{children:caption})]});const SetupTable=({headers,rows,label})=>{const[copied,setCopied]=useState(null);const[status,setStatus]=useState(``);const copyValue=async(value,name,key)=>{try{await navigator.clipboard.writeText(value);setCopied(key);setStatus(name+` copied.`)}catch{setCopied(null);setStatus(`Could not copy automatically. Select the value and copy it manually.`)}};return _jsxs(`div`,{className:`ss-setup-table not-prose`,children:[_jsxs(`table`,{\"aria-label\":label,role:`table`,className:headers.length>2?`ss-setup-wide`:``,children:[_jsx(`thead`,{role:`rowgroup`,children:_jsx(`tr`,{role:`row`,children:headers.map(header=>_jsx(`th`,{scope:`col`,role:`columnheader`,children:header},header))})}),_jsx(`tbody`,{role:`rowgroup`,children:rows.map((row,rowIndex)=>_jsxs(`tr`,{role:`row`,children:[_jsx(`th`,{scope:`row`,role:`rowheader`,children:row[0]}),row.slice(1).map((cell,cellIndex)=>{const value=typeof cell===`string`?cell:cell.value;const canCopy=typeof cell!==`string`\u0026\u0026cell.copy;const key=rowIndex+`-`+cellIndex;const name=row[0]+` — `+headers[cellIndex+1];return _jsx(`td`,{\"data-label\":headers[cellIndex+1],role:`cell`,children:_jsxs(`div`,{className:`ss-setup-value`,children:[canCopy?_jsx(`code`,{children:value}):_jsx(`span`,{children:value}),canCopy\u0026\u0026_jsx(`button`,{type:`button`,\"aria-label\":`Copy `+name,onClick:()=>copyValue(value,name,key),children:copied===key?`Copied`:`Copy`})]})},cellIndex)})]},rowIndex))})]}),_jsx(`div`,{className:status?`ss-copy-status`:`ss-visually-hidden`,role:`status`,\"aria-live\":`polite`,children:status})]})};function _createMdxContent(props){const _components={a:`a`,li:`li`,p:`p`,strong:`strong`,ul:`ul`,..._provideComponents(),...props.components},{Frame,Note,OptimizedImage,Step,Steps,_MdxComponentBoundary}=_components;if(!Frame)_missingMdxReference(`Frame`,true);if(!Note)_missingMdxReference(`Note`,true);if(!OptimizedImage)_missingMdxReference(`OptimizedImage`,true);if(!Step)_missingMdxReference(`Step`,true);if(!Steps)_missingMdxReference(`Steps`,true);if(!_MdxComponentBoundary)_missingMdxReference(`_MdxComponentBoundary`,true);return _jsxs(_Fragment,{children:[_jsxs(Note,{children:[_jsx(_components.p,{children:_jsx(_components.strong,{children:`Before you begin`})}),_jsxs(_components.ul,{children:[`\n`,_jsxs(_components.li,{children:[`In StudyStash, open `,_jsx(_components.strong,{children:`Integrations → Single Sign-On (SSO)`}),` and choose `,_jsx(_components.strong,{children:`Microsoft Entra`}),`. Copy the Entity ID and Reply URL from `,_jsx(_components.strong,{children:`SAML settings`}),`. See the `,_jsx(_components.a,{href:`/integrations/single-sign-on`,children:`SSO setup guide`}),` if you need help.`]}),`\n`,_jsx(_components.li,{children:`Make sure you have permission to create and configure enterprise applications in Microsoft Entra ID.`}),`\n`]})]}),`\n`,_jsxs(Steps,{children:[_jsxs(Step,{title:`Create the enterprise application`,titleSize:`h2`,id:`1-create-the-enterprise-application`,children:[_jsxs(_components.p,{children:[`In the `,_jsx(_components.a,{href:`https://entra.microsoft.com`,children:`Microsoft Entra admin centre`}),`, open `,_jsx(_components.strong,{children:`Enterprise applications`}),`. Select `,_jsx(_components.strong,{children:`New application`}),`, then `,_jsx(_components.strong,{children:`Create your own application`}),`.`]}),_jsx(Frame,{className:`ss-screenshot`,caption:`Create an enterprise application`,children:_jsx(OptimizedImage,{loading:`lazy`,src:`https://mintcdn.com/studystash-help/FFz54l9hIeIDPaHl/assets/7373377/7373399-image-20250810-182934.png?fit=max\u0026auto=format\u0026n=FFz54l9hIeIDPaHl\u0026q=85\u0026s=ec9413d8a4f213bbeaf7b2f1ebce0b89`,alt:`Create your own enterprise application.`,\"data-og-width\":`1600`,width:`1600`,\"data-og-height\":`849`,height:`849`,\"data-path\":`assets/7373377/7373399-image-20250810-182934.png`,\"data-optimize\":`true`,\"data-opv\":`3`,srcset:`https://mintcdn.com/studystash-help/FFz54l9hIeIDPaHl/assets/7373377/7373399-image-20250810-182934.png?w=280\u0026fit=max\u0026auto=format\u0026n=FFz54l9hIeIDPaHl\u0026q=85\u0026s=52a54e2889f3ccad31788ae7e9d6fc19 280w, https://mintcdn.com/studystash-help/FFz54l9hIeIDPaHl/assets/7373377/7373399-image-20250810-182934.png?w=560\u0026fit=max\u0026auto=format\u0026n=FFz54l9hIeIDPaHl\u0026q=85\u0026s=cc9a0c83ae10c606568f0a5ceca1a7bb 560w, https://mintcdn.com/studystash-help/FFz54l9hIeIDPaHl/assets/7373377/7373399-image-20250810-182934.png?w=840\u0026fit=max\u0026auto=format\u0026n=FFz54l9hIeIDPaHl\u0026q=85\u0026s=24b62c1f22261ff04b793b70b1126dd5 840w, https://mintcdn.com/studystash-help/FFz54l9hIeIDPaHl/assets/7373377/7373399-image-20250810-182934.png?w=1100\u0026fit=max\u0026auto=format\u0026n=FFz54l9hIeIDPaHl\u0026q=85\u0026s=18871a0f79ca42995e13cfef226be0f9 1100w, https://mintcdn.com/studystash-help/FFz54l9hIeIDPaHl/assets/7373377/7373399-image-20250810-182934.png?w=1650\u0026fit=max\u0026auto=format\u0026n=FFz54l9hIeIDPaHl\u0026q=85\u0026s=2502ce502703ab5fa9b19d399cf2c1b5 1650w, https://mintcdn.com/studystash-help/FFz54l9hIeIDPaHl/assets/7373377/7373399-image-20250810-182934.png?w=2500\u0026fit=max\u0026auto=format\u0026n=FFz54l9hIeIDPaHl\u0026q=85\u0026s=08de2e0990e4c788cadf93d294d3a7d8 2500w`})}),_jsxs(_components.p,{children:[`Name the application `,_jsx(_components.strong,{children:`StudyStash`}),`, choose `,_jsx(_components.strong,{children:`Integrate any other application you don’t find in the gallery (Non-gallery)`}),`, then select `,_jsx(_components.strong,{children:`Create`}),`.`]}),_jsx(Frame,{className:`ss-screenshot`,caption:`Create the StudyStash application`,children:_jsx(OptimizedImage,{loading:`lazy`,src:`https://mintcdn.com/studystash-help/FFz54l9hIeIDPaHl/assets/7373377/7373406-image-20250810-183208.png?fit=max\u0026auto=format\u0026n=FFz54l9hIeIDPaHl\u0026q=85\u0026s=05db563554e304c9b2a762fcf5573f8e`,alt:`Create StudyStash as a non-gallery application.`,\"data-og-width\":`1600`,width:`1600`,\"data-og-height\":`849`,height:`849`,\"data-path\":`assets/7373377/7373406-image-20250810-183208.png`,\"data-optimize\":`true`,\"data-opv\":`3`,srcset:`https://mintcdn.com/studystash-help/FFz54l9hIeIDPaHl/assets/7373377/7373406-image-20250810-183208.png?w=280\u0026fit=max\u0026auto=format\u0026n=FFz54l9hIeIDPaHl\u0026q=85\u0026s=835bb556eadbd072fd57d7decaad2962 280w, https://mintcdn.com/studystash-help/FFz54l9hIeIDPaHl/assets/7373377/7373406-image-20250810-183208.png?w=560\u0026fit=max\u0026auto=format\u0026n=FFz54l9hIeIDPaHl\u0026q=85\u0026s=f250e90ad98a327372266c1caf91c714 560w, https://mintcdn.com/studystash-help/FFz54l9hIeIDPaHl/assets/7373377/7373406-image-20250810-183208.png?w=840\u0026fit=max\u0026auto=format\u0026n=FFz54l9hIeIDPaHl\u0026q=85\u0026s=2bf3e379120879367c592fa7fb13123b 840w, https://mintcdn.com/studystash-help/FFz54l9hIeIDPaHl/assets/7373377/7373406-image-20250810-183208.png?w=1100\u0026fit=max\u0026auto=format\u0026n=FFz54l9hIeIDPaHl\u0026q=85\u0026s=e10d56ee9e054dfc655d288a99d50e89 1100w, https://mintcdn.com/studystash-help/FFz54l9hIeIDPaHl/assets/7373377/7373406-image-20250810-183208.png?w=1650\u0026fit=max\u0026auto=format\u0026n=FFz54l9hIeIDPaHl\u0026q=85\u0026s=ab29008831c1d47a4cff049c7724561c 1650w, https://mintcdn.com/studystash-help/FFz54l9hIeIDPaHl/assets/7373377/7373406-image-20250810-183208.png?w=2500\u0026fit=max\u0026auto=format\u0026n=FFz54l9hIeIDPaHl\u0026q=85\u0026s=1b828ebd482b20c95dc2d19864292a1e 2500w`})})]}),_jsx(Step,{title:`Assign users or groups`,titleSize:`h2`,id:`2-assign-users-or-groups`,children:_jsxs(_components.p,{children:[`Assign the users or groups who should be able to sign in. Follow Microsoft’s `,_jsx(_components.a,{href:`https://learn.microsoft.com/en-us/entra/identity/enterprise-apps/assign-user-or-group-access-portal?pivots=portal`,children:`user and group assignment guide`}),`. For a pilot, check the `,_jsx(_components.a,{href:`/administrators/pilot-sso-scope`,children:`access scope`}),` with your StudyStash contact.`]})}),_jsxs(Step,{title:`Enter the SAML configuration`,titleSize:`h2`,id:`3-enter-the-saml-configuration`,children:[_jsxs(_components.p,{children:[`Open `,_jsx(_components.strong,{children:`Single sign-on`}),` and choose `,_jsx(_components.strong,{children:`SAML`}),`. Edit `,_jsx(_components.strong,{children:`Basic SAML Configuration`}),`, enter the `,_jsx(_components.strong,{children:`Identifier (Entity ID)`}),` and `,_jsx(_components.strong,{children:`Reply URL`}),` copied from your StudyStash SSO page, then select `,_jsx(_components.strong,{children:`Save`}),`.`]}),_jsx(Frame,{className:`ss-screenshot`,caption:`Choose SAML`,children:_jsx(OptimizedImage,{loading:`lazy`,src:`https://mintcdn.com/studystash-help/FFz54l9hIeIDPaHl/assets/7373377/7340379-saml.png?fit=max\u0026auto=format\u0026n=FFz54l9hIeIDPaHl\u0026q=85\u0026s=3e3f67e8305f161a3fa92e3d20f7aca7`,alt:`Choose SAML in the enterprise application.`,\"data-og-width\":`3200`,width:`3200`,\"data-og-height\":`1698`,height:`1698`,\"data-path\":`assets/7373377/7340379-saml.png`,\"data-optimize\":`true`,\"data-opv\":`3`,srcset:`https://mintcdn.com/studystash-help/FFz54l9hIeIDPaHl/assets/7373377/7340379-saml.png?w=280\u0026fit=max\u0026auto=format\u0026n=FFz54l9hIeIDPaHl\u0026q=85\u0026s=706b4570a3e9cc1e83b5f49b932f79b6 280w, https://mintcdn.com/studystash-help/FFz54l9hIeIDPaHl/assets/7373377/7340379-saml.png?w=560\u0026fit=max\u0026auto=format\u0026n=FFz54l9hIeIDPaHl\u0026q=85\u0026s=e403c1023bc71c53ce4a3b17d2909517 560w, https://mintcdn.com/studystash-help/FFz54l9hIeIDPaHl/assets/7373377/7340379-saml.png?w=840\u0026fit=max\u0026auto=format\u0026n=FFz54l9hIeIDPaHl\u0026q=85\u0026s=d451c51297d0546cfd612a4e49aaa762 840w, https://mintcdn.com/studystash-help/FFz54l9hIeIDPaHl/assets/7373377/7340379-saml.png?w=1100\u0026fit=max\u0026auto=format\u0026n=FFz54l9hIeIDPaHl\u0026q=85\u0026s=ac5ade2aa52c97bd3b9403e99f50aef6 1100w, https://mintcdn.com/studystash-help/FFz54l9hIeIDPaHl/assets/7373377/7340379-saml.png?w=1650\u0026fit=max\u0026auto=format\u0026n=FFz54l9hIeIDPaHl\u0026q=85\u0026s=7486b52153bbed6301bbf537772e73db 1650w, https://mintcdn.com/studystash-help/FFz54l9hIeIDPaHl/assets/7373377/7340379-saml.png?w=2500\u0026fit=max\u0026auto=format\u0026n=FFz54l9hIeIDPaHl\u0026q=85\u0026s=984aa818a58aeeddfa27d7d1cc763647 2500w`})})]}),_jsxs(Step,{title:`Check attributes and claims`,titleSize:`h2`,id:`4-check-attributes-and-claims`,children:[_jsxs(_components.p,{children:[`Edit `,_jsx(_components.strong,{children:`Attributes \u0026 Claims`}),` and check the email NameID format and claims below.`]}),_jsx(_MdxComponentBoundary,{name:`SetupTable`,children:_jsx(SetupTable,{label:`Microsoft entra id settings`,headers:[`Setting`,`Claim or format`,`Source`],rows:[[`NameID`,{\"value\":`urn:oasis:names:tc:SAML:1.1:nameid-format:emailAddress`,\"copy\":true},`Institution email address`],[`Email (required)`,{\"value\":`urn:oid:0.9.2342.19200300.100.1.3`,\"copy\":true},{\"value\":`user.mail`,\"copy\":true}],[`First name (optional)`,{\"value\":`urn:oid:2.5.4.42`,\"copy\":true},{\"value\":`user.givenName`,\"copy\":true}],[`Last name (optional)`,{\"value\":`urn:oid:2.5.4.4`,\"copy\":true},{\"value\":`user.sn`,\"copy\":true}]]})}),_jsx(_components.p,{children:`Confirm the required email value is populated for the users you assign.`})]}),_jsxs(Step,{title:`Import the metadata into StudyStash`,titleSize:`h2`,id:`5-send-the-metadata-and-test`,children:[_jsxs(_components.p,{children:[`Under `,_jsx(_components.strong,{children:`SAML Certificates`}),`, copy the `,_jsx(_components.strong,{children:`App Federation Metadata Url`}),`.`]}),_jsx(Frame,{className:`ss-screenshot`,caption:`Copy the metadata URL`,children:_jsx(OptimizedImage,{loading:`lazy`,src:`https://mintcdn.com/studystash-help/FFz54l9hIeIDPaHl/assets/7373377/7373413-image-20250810-183607.png?fit=max\u0026auto=format\u0026n=FFz54l9hIeIDPaHl\u0026q=85\u0026s=dcb3e354e4de5b329a173a1eff3dcc8c`,alt:`Copy the App Federation Metadata Url from SAML Certificates.`,\"data-og-width\":`1600`,width:`1600`,\"data-og-height\":`809`,height:`809`,\"data-path\":`assets/7373377/7373413-image-20250810-183607.png`,\"data-optimize\":`true`,\"data-opv\":`3`,srcset:`https://mintcdn.com/studystash-help/FFz54l9hIeIDPaHl/assets/7373377/7373413-image-20250810-183607.png?w=280\u0026fit=max\u0026auto=format\u0026n=FFz54l9hIeIDPaHl\u0026q=85\u0026s=1a217ed5c359b5932e22ce9f3636b70f 280w, https://mintcdn.com/studystash-help/FFz54l9hIeIDPaHl/assets/7373377/7373413-image-20250810-183607.png?w=560\u0026fit=max\u0026auto=format\u0026n=FFz54l9hIeIDPaHl\u0026q=85\u0026s=d5568ef2adec8466e0f46a8ec3c691ab 560w, https://mintcdn.com/studystash-help/FFz54l9hIeIDPaHl/assets/7373377/7373413-image-20250810-183607.png?w=840\u0026fit=max\u0026auto=format\u0026n=FFz54l9hIeIDPaHl\u0026q=85\u0026s=38dbc46a82075a1458d82ccb6dc7d984 840w, https://mintcdn.com/studystash-help/FFz54l9hIeIDPaHl/assets/7373377/7373413-image-20250810-183607.png?w=1100\u0026fit=max\u0026auto=format\u0026n=FFz54l9hIeIDPaHl\u0026q=85\u0026s=22de51662594c7369aa005082aa852c5 1100w, https://mintcdn.com/studystash-help/FFz54l9hIeIDPaHl/assets/7373377/7373413-image-20250810-183607.png?w=1650\u0026fit=max\u0026auto=format\u0026n=FFz54l9hIeIDPaHl\u0026q=85\u0026s=f5f135d4e0c4a8c8cd5925b214b2aece 1650w, https://mintcdn.com/studystash-help/FFz54l9hIeIDPaHl/assets/7373377/7373413-image-20250810-183607.png?w=2500\u0026fit=max\u0026auto=format\u0026n=FFz54l9hIeIDPaHl\u0026q=85\u0026s=2f0a5c146dc0d8020d86aaf9707052db 2500w`})}),_jsxs(_components.p,{children:[`Return to StudyStash. Paste the URL into `,_jsx(_components.strong,{children:`App Federation Metadata URL`}),` and select `,_jsx(_components.strong,{children:`Import metadata`}),`. Review the result, then select `,_jsx(_components.strong,{children:`Send for setup`}),` or `,_jsx(_components.strong,{children:`Save changes`}),` for an existing connection.`]}),_jsx(_MdxComponentBoundary,{name:`ArticleScreenshot`,children:_jsx(ArticleScreenshot,{src:`/assets/integration-setup/sso-setup.jpg`,alt:`App Federation Metadata URL input and Import metadata button in StudyStash.`,caption:`Import metadata into StudyStash`,viewBox:`320 610 500 180`,width:1280,height:900})}),_jsxs(_components.p,{children:[`While `,_jsx(_components.strong,{children:`Awaiting StudyStash`}),` is shown, we are finishing setup.`]}),_jsxs(_components.p,{children:[`Once ready, select `,_jsx(_components.strong,{children:`Test connection`}),`. StudyStash will watch for a successful sign-in to confirm SSO is working. Sign in as an assigned user in the new tab; the status changes to `,_jsx(_components.strong,{children:`Connected`}),` after StudyStash confirms access.`]}),_jsxs(_components.p,{children:[`Test attempts expire within 10 minutes. If yours expires, select `,_jsx(_components.strong,{children:`Test connection`}),` to start again.`]}),_jsxs(_components.p,{children:[`See `,_jsx(_components.a,{href:`/integrations/single-sign-on#test-your-connection`,children:`testing and troubleshooting`}),` for sharing a test link, retrying or getting help.`]})]})]})]})}function MDXContent(props={}){const{wrapper:MDXLayout}={..._provideComponents(),...props.components};return MDXLayout?_jsx(MDXLayout,{...props,children:_jsx(_createMdxContent,{...props})}):_createMdxContent(props)}return{ArticleScreenshot,SetupTable,default:MDXContent};function _missingMdxReference(id,component){throw new Error(`Expected `+(component?`component`:`object`)+\" `\"+id+\"` to be defined: you likely forgot to import, pass, or provide it.\")}","frontmatter":{},"scope":{"config":{},"pageMetadata":{"icon":"/assets/integrations/microsoft-entra.svg","title":"Set up Microsoft Entra ID","sidebarTitle":"Microsoft Entra ID","description":"Configure the StudyStash enterprise application for SAML single sign-on.","href":"/integrations/microsoft-entra-id"}}},"mdxSourceWithNoJs":null,"noJsSplices":[[153,2027,")=>null;const SetupTable=()=>null;functi"]]},"mdxExtracts":{"tableOfContents":[{"title":"Create the enterprise application","slug":"1-create-the-enterprise-application","depth":2,"children":[]},{"title":"Assign users or groups","slug":"2-assign-users-or-groups","depth":2,"children":[]},{"title":"Enter the SAML configuration","slug":"3-enter-the-saml-configuration","depth":2,"children":[]},{"title":"Check attributes and claims","slug":"4-check-attributes-and-claims","depth":2,"children":[]},{"title":"Import the metadata into StudyStash","slug":"5-send-the-metadata-and-test","depth":2,"children":[]}],"codeExamples":{}},"jsLinks":[],"subdomain":"studystash-help","siteName":"StudyStash Help Centre","title":"Set up Microsoft Entra ID - StudyStash Help Centre","navMaps":{"firstHrefInVersion":{},"firstHrefInLanguage":{}},"lastModified":"2026-11-05T07:21:42.457Z","originalFileLocation":"integrations/microsoft-entra-id.mdx"},"headHtml":"\u003cscript data-mint-head>(function(){var d=document.documentElement,p=\"light\";if(!p){try{p=localStorage.getItem(\"isDarkMode\")}catch(e){}if(p==='true')p='dark';else if(p==='false')p='light';if(p!=='light'\u0026\u0026p!=='dark'\u0026\u0026p!=='system')p=\"light\"}var r=p==='system'?(matchMedia(\"(prefers-color-scheme: dark)\").matches?'dark':'light'):p;d.classList.remove(r==='dark'?'light':'dark');d.classList.add(r);d.setAttribute(\"data-theme-preference\",p)})();\u003c/script>\u003cmeta data-mint-head name=\"description\" content=\"Configure the StudyStash enterprise application for SAML single sign-on.\">\u003cmeta data-mint-head name=\"application-name\" content=\"StudyStash Help Centre\">\u003cmeta data-mint-head name=\"generator\" content=\"Mintlify\">\u003clink data-mint-head rel=\"icon\" type=\"image/png\" sizes=\"192x192\" href=\"/mintlify-assets/_mintlify/favicons/studystash-help/-b5B2t5a5Xx_s6QU/_generated/favicon/android-chrome-192x192.png\" media=\"(prefers-color-scheme: light)\">\u003clink data-mint-head rel=\"apple-touch-icon\" type=\"image/png\" sizes=\"180x180\" href=\"/mintlify-assets/_mintlify/favicons/studystash-help/-b5B2t5a5Xx_s6QU/_generated/favicon/apple-touch-icon.png\">\u003clink data-mint-head rel=\"icon\" type=\"image/png\" sizes=\"16x16\" href=\"/mintlify-assets/_mintlify/favicons/studystash-help/-b5B2t5a5Xx_s6QU/_generated/favicon/favicon-16x16.png\" media=\"(prefers-color-scheme: light)\">\u003clink data-mint-head rel=\"icon\" type=\"image/png\" sizes=\"32x32\" href=\"/mintlify-assets/_mintlify/favicons/studystash-help/-b5B2t5a5Xx_s6QU/_generated/favicon/favicon-32x32.png\" media=\"(prefers-color-scheme: light)\">\u003clink data-mint-head rel=\"shortcut icon\" type=\"image/x-icon\" href=\"/mintlify-assets/_mintlify/favicons/studystash-help/-b5B2t5a5Xx_s6QU/_generated/favicon/favicon.ico\" media=\"(prefers-color-scheme: light)\">\u003clink data-mint-head rel=\"icon\" type=\"image/png\" sizes=\"192x192\" href=\"/mintlify-assets/_mintlify/favicons/studystash-help/-b5B2t5a5Xx_s6QU/_generated/favicon-dark/android-chrome-192x192.png\" media=\"(prefers-color-scheme: dark)\">\u003clink data-mint-head rel=\"icon\" type=\"image/png\" sizes=\"16x16\" href=\"/mintlify-assets/_mintlify/favicons/studystash-help/-b5B2t5a5Xx_s6QU/_generated/favicon-dark/favicon-16x16.png\" media=\"(prefers-color-scheme: dark)\">\u003clink data-mint-head rel=\"icon\" type=\"image/png\" sizes=\"32x32\" href=\"/mintlify-assets/_mintlify/favicons/studystash-help/-b5B2t5a5Xx_s6QU/_generated/favicon-dark/favicon-32x32.png\" media=\"(prefers-color-scheme: dark)\">\u003clink data-mint-head rel=\"shortcut icon\" type=\"image/x-icon\" href=\"/mintlify-assets/_mintlify/favicons/studystash-help/-b5B2t5a5Xx_s6QU/_generated/favicon-dark/favicon.ico\" media=\"(prefers-color-scheme: dark)\">\u003cmeta data-mint-head property=\"og:title\" content=\"Set up Microsoft Entra ID - StudyStash Help Centre\">\u003cmeta data-mint-head property=\"og:description\" content=\"Configure the StudyStash enterprise application for SAML single sign-on.\">\u003cmeta data-mint-head property=\"og:site_name\" content=\"StudyStash Help Centre\">\u003cmeta data-mint-head property=\"og:url\" content=\"https://help2.studystash.com/integrations/microsoft-entra-id\">\u003cmeta data-mint-head property=\"og:type\" content=\"website\">\u003cmeta data-mint-head property=\"og:image\" content=\"https://studystash-help.mintlify.app/_mintlify/api/og/v2?division=Single+sign-on\u0026amp;title=Set+up+Microsoft+Entra+ID\u0026amp;description=Configure+the+StudyStash+enterprise+application+for+SAML+single+sign-on.\u0026amp;theme=6572ff383200a8150fc7ac1b\u0026amp;signature=aa82ad308ad3c8762d29ce7b17c7b1c7e3fca3378109ec5d6690f34c3a9d6c3f\">\u003cmeta data-mint-head property=\"og:image:width\" content=\"1200\">\u003cmeta data-mint-head property=\"og:image:height\" content=\"630\">\u003cmeta data-mint-head name=\"twitter:card\" content=\"summary_large_image\">\u003cmeta data-mint-head name=\"twitter:title\" content=\"Set up Microsoft Entra ID - StudyStash Help Centre\">\u003cmeta data-mint-head name=\"twitter:description\" content=\"Configure the StudyStash enterprise application for SAML single sign-on.\">\u003cmeta data-mint-head name=\"twitter:image\" content=\"https://studystash-help.mintlify.app/_mintlify/api/og/v2?division=Single+sign-on\u0026amp;title=Set+up+Microsoft+Entra+ID\u0026amp;description=Configure+the+StudyStash+enterprise+application+for+SAML+single+sign-on.\u0026amp;theme=6572ff383200a8150fc7ac1b\u0026amp;signature=aa82ad308ad3c8762d29ce7b17c7b1c7e3fca3378109ec5d6690f34c3a9d6c3f\">\u003cmeta data-mint-head name=\"twitter:image:width\" content=\"1200\">\u003cmeta data-mint-head name=\"twitter:image:height\" content=\"630\">\u003cmeta data-mint-head name=\"msapplication-config\" content=\"/mintlify-assets/_mintlify/favicons/studystash-help/-b5B2t5a5Xx_s6QU/_generated/favicon/browserconfig.xml\">\u003cmeta data-mint-head name=\"apple-mobile-web-app-title\" content=\"StudyStash Help Centre\">\u003cmeta data-mint-head name=\"msapplication-TileColor\" content=\"#004C89\">\u003clink data-mint-head rel=\"canonical\" href=\"https://help2.studystash.com/integrations/microsoft-entra-id\">\u003clink data-mint-head rel=\"alternate\" type=\"application/xml\" href=\"/sitemap.xml\">\u003clink data-mint-head rel=\"alternate\" type=\"text/markdown\" href=\"/integrations/microsoft-entra-id.md\">\u003cscript data-mint-head type=\"application/ld+json\">{\"@context\":\"https://schema.org\",\"@graph\":[{\"@type\":\"Organization\",\"@id\":\"https://help2.studystash.com/#organization\",\"name\":\"StudyStash Help Centre\",\"url\":\"https://help2.studystash.com\",\"logo\":{\"@type\":\"ImageObject\",\"url\":\"https://mintcdn.com/studystash-help/UbXlxW0z5agaJ_Cy/logo/studystash-logo-colour-rgb.png?fit=max\u0026auto=format\u0026n=UbXlxW0z5agaJ_Cy\u0026q=85\u0026s=b42380e4f9b27366a5d79712531f7301\"}},{\"@type\":\"WebSite\",\"@id\":\"https://help2.studystash.com#website\",\"name\":\"StudyStash Help Centre\",\"url\":\"https://help2.studystash.com\",\"publisher\":{\"@id\":\"https://help2.studystash.com/#organization\"}},{\"@type\":\"WebPage\",\"@id\":\"https://help2.studystash.com/integrations/microsoft-entra-id#webpage\",\"url\":\"https://help2.studystash.com/integrations/microsoft-entra-id\",\"name\":\"Set up Microsoft Entra ID\",\"description\":\"Configure the StudyStash enterprise application for SAML single sign-on.\",\"dateModified\":\"2026-11-05T07:21:42.457Z\",\"isPartOf\":{\"@id\":\"https://help2.studystash.com#website\"},\"breadcrumb\":{\"@id\":\"https://help2.studystash.com/integrations/microsoft-entra-id#breadcrumb\"}},{\"@type\":\"BreadcrumbList\",\"@id\":\"https://help2.studystash.com/integrations/microsoft-entra-id#breadcrumb\",\"itemListElement\":[{\"@type\":\"ListItem\",\"position\":1,\"name\":\"Integrations\",\"item\":\"https://help2.studystash.com/integrations/canvas\"},{\"@type\":\"ListItem\",\"position\":2,\"name\":\"Single sign-on\",\"item\":\"https://help2.studystash.com/integrations/single-sign-on\"},{\"@type\":\"ListItem\",\"position\":3,\"name\":\"Set up Microsoft Entra ID\",\"item\":\"https://help2.studystash.com/integrations/microsoft-entra-id\"}]},{\"@type\":[\"Article\",\"TechArticle\"],\"@id\":\"https://help2.studystash.com/integrations/microsoft-entra-id#article\",\"headline\":\"Set up Microsoft Entra ID\",\"name\":\"Set up Microsoft Entra ID\",\"description\":\"Configure the StudyStash enterprise application for SAML single sign-on.\",\"url\":\"https://help2.studystash.com/integrations/microsoft-entra-id\",\"mainEntityOfPage\":{\"@id\":\"https://help2.studystash.com/integrations/microsoft-entra-id#webpage\"},\"dateModified\":\"2026-11-05T07:21:42.457Z\",\"publisher\":{\"@id\":\"https://help2.studystash.com/#organization\"},\"isPartOf\":{\"@id\":\"https://help2.studystash.com#website\"}}]}\u003c/script>\u003cscript data-mint-head type=\"application/ld+json\">{\"@context\":\"https://schema.org\",\"@type\":\"WebSite\",\"name\":\"StudyStash Help Centre\",\"creator\":{\"@type\":\"Organization\",\"name\":\"Mintlify\",\"url\":\"https://mintlify.com\"}}\u003c/script>","siteName":"StudyStash Help Centre","nav":{"global":null,"tabs":[{"tab":"Start here","pages":[{"title":"Start here","href":""}]},{"tab":"Students","pages":[{"title":"Students","href":"/students/overview"}]},{"tab":"Instructors","pages":[{"title":"Instructors","href":"/educators/overview"}]},{"tab":"Administrators","groups":[{"group":"Get started","root":{"title":"Get started for administrators","sidebarTitle":"Get started","href":"/administrators/overview"},"expanded":true,"pages":[{"title":"Use the Admin Dashboard","sidebarTitle":"Admin Dashboard","href":"/administrators/admin-dashboard"},{"title":"Get documents for your pilot","sidebarTitle":"Pilot documentation","href":"/administrators/pilot-documentation"}]},{"group":"Manage students and staff","pages":[{"group":"Import students and staff","root":{"title":"Import students and instructors","sidebarTitle":"Import students and staff","href":"/administrators/student-csv-template"},"pages":[{"icon":"https://mintlify.s3.us-west-1.amazonaws.com/studystash-help/assets/lms/canvas.png","title":"Export a student list from Canvas","sidebarTitle":"Export from Canvas","href":"/administrators/export-canvas-roster"},{"icon":"https://mintlify.s3.us-west-1.amazonaws.com/studystash-help/assets/lms/moodle.png","title":"Export a student list from Moodle","sidebarTitle":"Export from Moodle","href":"/administrators/export-moodle-roster"}]},{"title":"Set up instructor insight emails","sidebarTitle":"Set up insight emails","href":"/administrators/set-up-insight-emails"},{"title":"Set student reminder dates","sidebarTitle":"Student reminders","href":"/administrators/student-reminders"},{"title":"Understand student activity","sidebarTitle":"Active students","href":"/administrators/active-students"}]},{"group":"Integrations","pages":[{"group":"LMS integrations","pages":[{"icon":"https://mintlify.s3.us-west-1.amazonaws.com/studystash-help/assets/lms/canvas.png","title":"Set up StudyStash in Canvas","sidebarTitle":"Set up Canvas","href":"/integrations/canvas"},{"group":"Moodle","icon":"/assets/lms/moodle.png","pages":[{"icon":"https://mintlify.s3.us-west-1.amazonaws.com/studystash-help/assets/lms/moodle.png","title":"Set up StudyStash in Moodle","sidebarTitle":"Set up Moodle","href":"/integrations/moodle"},{"group":"Roll out to multiple courses","root":{"icon":"https://mintlify.s3.us-west-1.amazonaws.com/studystash-help/assets/lms/moodle.png","title":"Roll out StudyStash to multiple Moodle courses","sidebarTitle":"Roll out to multiple courses","href":"/integrations/moodle-course-sync"},"pages":[{"icon":"https://mintlify.s3.us-west-1.amazonaws.com/studystash-help/assets/lms/moodle.png","title":"Moodle rollout: opt-in","sidebarTitle":"Opt-in courses","href":"/integrations/moodle-opt-in-sync"},{"icon":"https://mintlify.s3.us-west-1.amazonaws.com/studystash-help/assets/lms/moodle.png","title":"Moodle rollout: opt-out","sidebarTitle":"Opt-out courses","href":"/integrations/moodle-opt-out-sync"}]}]},{"group":"D2L Brightspace","icon":"/assets/lms/brightspace.png","pages":[{"icon":"https://mintlify.s3.us-west-1.amazonaws.com/studystash-help/assets/lms/brightspace.png","title":"Set up StudyStash in D2L Brightspace","sidebarTitle":"Set up Brightspace","href":"/integrations/d2l-brightspace"},{"icon":"https://mintlify.s3.us-west-1.amazonaws.com/studystash-help/assets/lms/brightspace.png","title":"Open StudyStash in a new window in Brightspace","sidebarTitle":"Open in a new window","href":"/integrations/brightspace-new-window"}]},{"icon":"https://mintlify.s3.us-west-1.amazonaws.com/studystash-help/assets/lms/blackboard.png","title":"Set up StudyStash in Blackboard","sidebarTitle":"Set up Blackboard","href":"/integrations/blackboard"}]},{"group":"Single sign-on","pages":[{"title":"Set up single sign-on","sidebarTitle":"Set up SSO","description":"Submit your SAML metadata, let StudyStash finish setup and test your institution’s sign-in.","href":"/integrations/single-sign-on"},{"icon":"https://mintlify.s3.us-west-1.amazonaws.com/studystash-help/assets/integrations/microsoft-entra.svg","title":"Set up Microsoft Entra ID","sidebarTitle":"Microsoft Entra ID","href":"/integrations/microsoft-entra-id"},{"title":"Scope access for your pilot","sidebarTitle":"Access during a pilot","description":"Understand why StudyStash recommends enabling SSO without restricting it to a pilot group.","href":"/administrators/pilot-sso-scope"}]},{"group":"Other integrations","pages":[{"icon":"https://mintlify.s3.us-west-1.amazonaws.com/studystash-help/assets/integrations/eab.png","title":"Connect StudyStash to Navigate360","sidebarTitle":"Navigate360","href":"/integrations/navigate360"}]}]},{"group":"Content compatibility","pages":[{"title":"SCORM, H5P and other content formats","sidebarTitle":"Content formats","href":"/integrations/scorm-xapi-h5p"},{"title":"Use third-party course content","sidebarTitle":"Third-party content","href":"/educators/third-party-content"},{"title":"Video and transcripts","sidebarTitle":"Video and transcripts","href":"/educators/video-uploads"}]},{"group":"Pilots and evaluation","pages":[{"title":"Request a custom consent form","sidebarTitle":"Custom consent forms","href":"/administrators/custom-consent-form"},{"title":"Request a live demo","sidebarTitle":"Request a demo","href":"/administrators/request-demo"},{"title":"Pilot evaluation questions","sidebarTitle":"Evaluation questions","href":"/educators/evaluation-questions"},{"title":"StudyStash and D2L Lumi","href":"/about/studystash-and-d2l-lumi"}]}]}]},"basePath":"","title":"Set up Microsoft Entra ID - StudyStash Help Centre","buildId":"dpl_9VVk5y1P8k1ATeJguVngy9Q3cmbD","deploymentId":"dpl_9VVk5y1P8k1ATeJguVngy9Q3cmbD","dynamics":["07c022d89b","a74be98ba7"],"chunks":["Frame-BdiBGm0H.js","DynamicMarkdown-CbqEDjbV.js","zoom-image-lightbox-CvtNkYOX.js","lightbox-handle-r17bVUz3.js"]}